Manuál Vango Nimbus 300 Stan

Potřebujete manuál pro svůj Vango Nimbus 300 Stan? Níže si můžete zdarma prohlédnout a stáhnout PDF manuál v češtině. Tento produkt má aktuálně 7 často kladené otázky, 0 komentářů a má 0 hlasů. Pokud toto není manuál, který chcete, kontaktujte nás.

Je váš výrobek vadný a manuál nenabízí žádné řešení? Přejděte do Repair Café a získejte opravu zdarma.

Manuál

Loading…

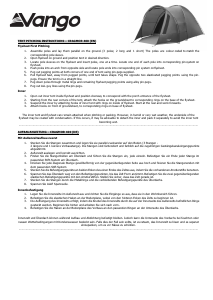
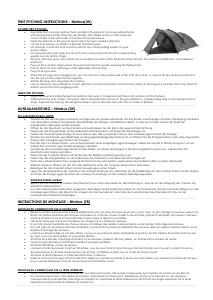
TENT PITCHING INSTRUCTIONS Nimbus(UK)
FLYSHEET FIRST PITCHING:
Assemble the four poles and lay them parallel on the ground. Two poles will be shorter
with a pre bend and the other two are straight. The middle sections of the poles are
colour coded to link with a tab on the end of the pole sleeve.
Open the flysheet on the ground and position the tent in desired direction.
Locate pole sleeves on outside of flysheet and insert poles.
On one side, locate the end of each pole into the corresponding eyelets on pole
anchor straps.
On opposite side, push poles into an arch and locate pole ends into the corresponding
eyelets on pole anchor straps.
The tent will stand up by itself, which lets you finalise its position. Pitch the back of the tent into the wind for a stable tent, and sheltered
entrance.
Peg out the 6 anchor straps where the poles insert into the eyelets, keeping the flysheet taut.
Pull out the front door and peg out the adjustable anchor strap.
Peg out ALL guy lines.
When the front guy line is pegged out, you can choose to have either side of the front door open, or open both zips and roll up the door
into the net pocket under the front guyline.
Attach the inner tent using instructions below
Lay out the porch groundsheet in correct direction. Connect the plastic hooks at rear corners to the rings at pole base; then loop the front
elastics around the front pegging points.
INNER FIRST PITCHING:
Open out inner tent inside flysheet and position doorway to correspond with the porch entrance of the flysheet.
Starting from the rear corners of the tent, attach the elasticated hooks on the groundsheet to corresponding rings on the flysheet anchor
straps. Suspend the inner by attaching the elastic loops of the inner tent with clips on inside of flysheet.
………………………………………………………………………………………………………………………………………………………………………………………….....
AUFBAUANLEITUNG Nimbus (DE)
MIT AUßENZELTAUFBAU ZUERST:
Stecken Sie die vier Stangen zusammen und legen Sie sie parallel zueinander auf den Boden. Zwei Stangen mit einer Vorbiegung sind kürzer
und die beiden anderen sind gerade. Die Mittelteile der Stangen sind farblich markiert, so dass sie mit einer Lasche am Ende der
Stangenhülle verbunden werden können.
Öffnen Sie das Überdach auf dem Boden und positionieren Sie das Zelt in der gewünschten Richtung.
Fixieren Sie die Stangenhüllen an der Außenseite des Überdachs und führen Sie die Stangen ein.
Fixieren Sie das Ende jeder Stange an einer Seite in den dazu passenden Ösen in den Verankerungsschnüren der Stangen.
Drücken Sie die Stangen gewölbeförmig an der gegenüberliegenden Seite hoch und fixieren Sie die Stangenenden in den dazu passenden
Ösen in den Verankerungsschnüren der Stangen.
Das Zelt wird von alleine stehen, was es Ihnen erlaubt, seine endgültige Lage festzulegen. Stellen Sie das Zelt in Windrichtung auf, um ein
stabiles Zelt und einen geschützten Eingang zu erhalten.
Stecken Sie die 6 Verankerungsschnüre an den Stellen, an denen die Stangen in die Ösen eingeführt wurden aus, während Sie das
Überdach unter Spannung halten.
Ziehen Sie die Vordertür heraus und stecken Sie die flexible Verankerungsschnur aus.
Fixieren Sie die Stangenhüllen an der Außenseite des Überdachs und führen Sie die Stangen ein.
Wenn die vordere Spannschnur ausgesteckt ist können Sie entscheiden, beide Seiten der Vordertür offen zu lassen oder beide
Reißverschlüsse zu öffnen und die Tür in die Netztasche unter der vorderen Spannschnur einzurollen.
Befestigen Sie das Innenzelt, indem Sie den Anweisungen unten folgen.
Legen Sie die Bodenplane des Vorbaus in der richtigen Richtung aus. Verbinden Sie die Plastikhaken an den hinteren Ecken mit den Ringen
am Ende der Stange, legen Sie dann die vorderen Gummiringe um die vorderen Befestigungspunkte.
NNENZELT-ZUERST-AUFBAU
Breiten Sie das Innenzelt im Inneren des Überdachs aus und positionieren Sie die Türöffnung so, dass sie mit dem Eingang des Vorbaus am
Überdach übereinstimmt.
Von den hinteren Ecken des Zeltes ausgehend, befestigen Sie die elastischen Haken an der Bodenplane mit den passenden Ringen an den
Verankerungsschnüren des Überdachs. Hängen Sie das Innenzelt ein, indem Sie die Gummibänder des Innenzelts mit Clips an der
Innenseite des Überdachs befestigen.
………………………………………………………………………………………………………………………………………………………………………………………….....
INSTRUCTIONS DE MONTAGE Nimbus (FR)
MONTAGE EN COMMENÇANT PAR LE DOUBLE TOIT:
Réunir les quatre arceaux et les poser parallèlement sur le sol. Deux arceaux seront plus courts, avec un pré-cintrage et les deux autres sont
droits. Les parties médianes des arceaux possèdent un code de couleur à relier à une attache, placée à l'extrémité du fourreau d'arceau.
Ouvrir le double toit sur le toit et positionner la tente dans la direction souhaitée.
Placer les fourreaux d'arceau à l'extérieur du double toit et y insérer les arceaux.
D'un côté, placer l'extrémité de chaque arceau à l'intérieur des oeillets correspondants, sur les bandes d'ancrage des arceaux.
Du côté opposé, pousser les arceaux à l'intérieur d'une arche et placer les extrémités des arceaux dans les oeillets correspondants, sur les
bandes d'ancrage des arceaux.
La tente se dressera debout par elle-même, ce qui va vous laisser le temps de finaliser sa position. Monter l'arrière de la tente dans le sens
du vent, pour une tente stable, et une entrée abritée.
Attacher les 6 bandes d'ancrage à l'endroit où les arceaux s'insèrent dans les oeillets, en maintenant le double toit tendu.
Ouvrir la porte d'entrée et attacher la bande d'ancrage ajustable.
Attacher TOUTES les cordes de tension.
Lorsque la corde de tension avant est attachée, vous pouvez choisir d'avoir chaque côté de la porte avant ouvert, ou bien d'ouvrir les
deux fermetures et de faire rouler la porte vers le haut, à l'intérieur du filet, sous la corde de tension avant.
Attacher la tente intérieure, à l'aide des instructions ci-dessous.
Etaler le sol du porche dans la bonne direction. Relier les crochets en plastique situés aux coins arrière, aux anneaux à la base de l'arceau ;
puis, nouer les élastiques à l'avant autour des points de fixation avant.
MONTAGE EN COMMENÇANT PAR LA TENTE INTÉRIEURE
Ouvrir la tente intérieure, dans le double toit et positionner la porte, afin qu'elle corresponde avec l'entrée du porche du double toit.
En commençant par les coins arrière de la tente, attacher les crochets munis d'élastiques, placés sur le tapis de sol, aux anneaux
correspondants sur les bandes d'ancrage du double toit. Suspendre la tente intérieure en attachant les sangles élastiques de la tente
intérieure aux clips placés à l'intérieur du double toit.
………………………………………………………………………………………………………………………………………………………………………………………….....
Stáhnout manuál v český (PDF, 0.13 MB)
(Zvažte dopad na životní prostředí a tento manuál si vytiskněte pouze v případě, že výtisk skutečně potřebujete)

Loading…

Hodnocení

Ohodnoťte Vango Nimbus 300 Stan a dejte nám vědět, co si o výrobku myslíte. Chcete se podělit o své zkušenosti s tímto výrobkem nebo se na něco zeptat? Nechte nám ve spodní části stránky komentář.
Jste spokojeni s Vango Nimbus 300 Stan?
Ano Ne
Ohodnoťte tento výrobek jako první
0 hlasy

Zapojte se do konverzace o tomto výrobku

Zde můžete sdílet, co si myslíte o Vango Nimbus 300 Stan. Máte-li dotaz, nejprve si pozorně přečtěte návod. Žádost o příručku lze provést pomocí našeho kontaktního formuláře.

Více o tomto návodu

Chápeme, že je hezké mít k vašemu Vango Nimbus 300 Stan papírovou příručku. Manuál si můžete vždy stáhnout z našich webových stránek a vytisknout si jej sami. Pokud byste chtěli mít originální příručku, doporučujeme vám kontaktovat Vango. Možná by byli schopni poskytnout originální návod. Hledáte příručku ke svému Vango Nimbus 300 Stan v jiném jazyce? Vyberte si preferovaný jazyk na naší domovské stránce a vyhledejte číslo modelu, abyste zjistili, zda jej máme k dispozici.

Specifikace

Značka Vango
Modelka Nimbus 300
Kategorie Stany
Typ souboru PDF
Velikost souboru 0.13 MB

Všechny návody pro Vango Stany
Další manuály Stany

Často kladené otázky o Vango Nimbus 300 Stan

Náš tým podpory vyhledává užitečné produktové informace a odpovídá na často kladené otázky. Pokud v nich najdete nějakou nepřesnost, kontaktujte nás prostřednictvím našeho kontaktního formuláře.

Mohu svůj stan uložit, když je mokrý? Ověřeno

Pouze na velmi krátkou dobu. Je-li stan skladován mokrý po dobu jednoho týdne nebo déle, může plesnivět. To je škodlivé pro váš stan a možná i pro vaše zdraví.

To bylo užitečné (384) Přečtěte si více

Jak mohu impregnovat stan? Ověřeno

Postavte stan, očistěte hadřík a nechte jej uschnout. Naneste impregnační prostředek na hadřík postřikovačem rostlin nebo jiným postřikem. Je také možné použít malířský váleček nebo štětec. Tkanina musí být plně nasycena impregnačním prostředkem. Ošetřete také vnitřek stanu. Všechna okna důkladně očistěte vlhkým hadříkem. Nenechte impregnační prostředek na něm zaschnout. Nechte stanový hadřík úplně vyschnout. V případě potřeby léčbu opakujte.

To bylo užitečné (285) Přečtěte si více

Mohu sám opravit slzu nebo otvor v plátně svého stanu? Ověřeno

Pro plátna ze syntetického stanu jsou k dispozici speciální kousky samolepících nášivek. Nalepte jednu z těchto náplastí na obě strany otvoru nebo ji roztrhněte. Pro bavlněná stanová plátna nebo plachty ze směsného materiálu je nejlepší použít nášivky, které lze nažehlit. To bude vyžadovat žehličku.

To bylo užitečné (218) Přečtěte si více

Zip mého stanu nebude fungovat hladce, co mám dělat? Ověřeno

Pokud zip běží hladce, použijte suchý sprej z PTFE nebo silikonový sprej. Nestříkejte na hadřík a preventivně stříkejte, abyste zabránili budoucím problémům.

To bylo užitečné (156) Přečtěte si více

Na vnitřní straně stanu jsou kapky vody, znamená to, že prosakuje? Ověřeno

Ne, to je pravděpodobně kondenzace. Zajistěte, aby byl stan řádně větrán, aby byla kondenzace co nejnižší.

To bylo užitečné (129) Přečtěte si více

Jaké stanové kolíky je nejlepší použít pro jaký povrch? Ověřeno

Na pastvinách nebo lesních površích můžete použít půlkruhové nebo plastové kolíky. Na skalnatém povrchu musíte použít skalní kolíky. Na hliněné povrchy můžete použít půlkruhové, plastové nebo univerzální kolíky. Na štěrkových plochách potřebujete půlkruhové nebo univerzální kolíky a na písku musíte použít dřevěné kolíky.

To bylo užitečné (105) Přečtěte si více

Impregnační prostředek zanechává na stanu plátěné bílé skvrny nebo bílý opar, co s tím mohu dělat? Ověřeno

Pokud prostředek zanechá bílý opar nebo bílé skvrny na látce stanu, znamená to, že jste na tato místa nanesli více impregnačního prostředku. To není škodlivé a skvrny často časem zmizí. Nedoporučuje se používat méně impregnačního prostředku, aby se zabránilo vzniku skvrn. Aby bylo dosaženo dobrých výsledků, je nutné látku plně nasáknout impregnačním prostředkem.

To bylo užitečné (97) Přečtěte si více
Manuál Vango Nimbus 300 Stan

Související produkty

Související kategorie