
4
04 / 2015
CS93070
CASA SI
Marketing- und VertriebsgmbH
Obkirchergasse 36, 1190 Wien / Vienna, Austria
T +43 1 440 28 62
F +43 1 440 28 62 17
E ofce@casasi.com
www.casasi.com
Serviceadresse / Service Address
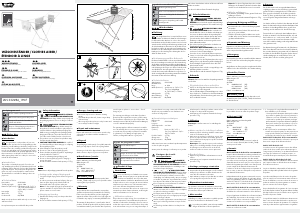
Montage- und Betriebsanleitung
Lesen Sie diese Bedienungsanleitung vollständig durch und bewahren Sie diese zu Nach-
schlagezwecken auf.
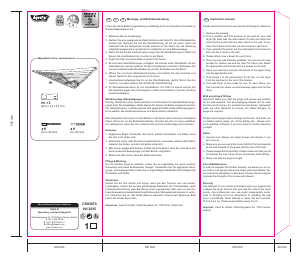
1. Entfernen Sie die Verpackung.
2. Suchen Sie eine geeignete und feste Stelle an der Wand für Ihren Wandwäschetrock-
ner (B). Nehmen Sie nun die Wandhalterung (A) mit der einen Hand und markieren Sie
die Bohrpunkte mit der anderen an die Wand. Um die Halterung möglichst waagerecht
zu positionieren empfehlen wir eine Wasserwaage.
3. Wenn Sie die Punkte markiert haben, legen Sie die Wandhalterung zur Seite und boh-
ren Sie anschließend die 4 Löcher in die Wand.
4. Fügen Sie bitte nun einen Dübel in jedes Loch hinein.
5. Es sind zwei Wandhalterungen verfügbar. Sie können einen Wandhalter für den Au-
ßenbereich und den anderen für den Innenbereich montieren. Befestigen Sie nun die
entsprechende Wandhalterung mit den Schrauben an die Wand.
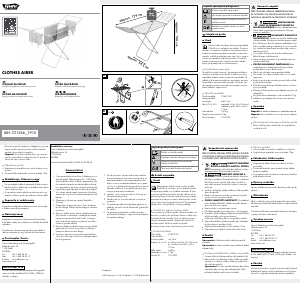
6. Öffnen Sie nun Ihren Wandwäschetrockner und drehen Sie das Gewinde vom oberen
Gelenk in das vorgesehene Loch hinein.
7. Anschließend befestigen Sie Ihn an die Wandhalterung. Hierfür führen Sie den Trock-
ner von oben herab in den Schlitz der Wandhalterung.
8. Ihr Wandwäschetrockner ist nun einsatzbereit. Um Platz zu sparen können Sie das
Gewinde gegen den Uhrzeigersinn wieder herausdrehen und den Trockner zusam-
menklappen.
Wandmontage & Befestigungen
Wichtig: Stellen Sie sicher, dass die Dübel und Schrauben für das Wandmaterial geeignet
sind. Die beigefügten Dübel können für Ziegel und Beton eingesetzt werden. Für Gasbe-
tonsteine, Leichtbauwände sind gegebenenfalls andere Befestigungsmittel zu wählen. Bei
Holzkonstruktionen sind keine Dübel erforderlich.
Bitte überprüfen Sie immer vor dem Bohren in die Wand, dass sich keine versteckten
Kabel, Rohre etc. an der Bohrstelle benden. Wenden Sie sich an einen qualizierten
Handwerker, wenn Sie sich unsicher sind und sich die Montage nicht zutrauen.
Hinweise
1. Allgemeine Regel: Verwenden Sie immer größere Schrauben und Dübel, wenn Sie sich
nicht sicher sind.
2. Stellen Sie sicher, dass Sie den korrekten Bohrer verwenden, welcher dem Wandmate-
rial, der Dübel- und der Lochgröße entspricht.
3. Bitte immer waagerecht bohren. Achten Sie bitte darauf, dass Sie nicht das Loch durch
kreisende Bewegungen mit dem Bohrer vergrößern.
4. Stellen Sie bitte sicher, dass die Dübel fest sitzen.
Pege & Wartung
Um Ihr Produkt lange zu erhalten, sollten Sie es regelmäßig mit einem weichen Schwamm
und etwas Seifenwasser reinigen. Verwenden Sie nie aggressive Reinigungs- oder Scheu-
ermittel. Prüfen Sie in regelmäßigen Abständen die Festigkeit der Schrauben und Dübel.
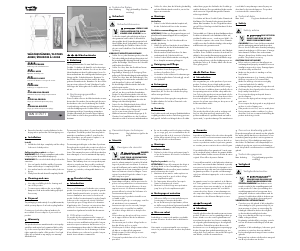
Sicherheit
Achten Sie auf Ihre Hände und Finger, wenn Sie den Trockner auf- und zusammenklap-
pen. Achten Sie auf das gleichmäßige Bestücken der Trockenstäbe. Jeder professionelle
Einsatz, jede Benutzung unter ungeeigneten oder eine von der Gebrauchsanweisung ab-
weichende Handhabung des Wandwäschetrockners ist verboten. Versuchen Sie nie, das
Gerät selbst zu reparieren. Dies ist kein Spielzeug. Bitte halten Sie Kinder davon fern.
Importeur: Casa Si GmbH, Obkirchergasse 36, 1190 Wien, Österreich
Instruction manual
Please read instructions for use carefully and keep for reference.
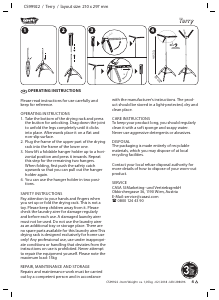
1. Remove the packing.
2. Find a suitable and rm position on the wall for your wall dryer
(B). Now take the wall bracket (A) with one hand and mark the
drill points with the other hand on the wall. To position the bracket
horizontal, we recommend a spirit level.
3. If you selected the points, put the wall bracket to the side and
then drill the 4 holes in the wall.
4. Please attach now a dowel into each hole.
5. There are two wall brackets available. You can mount a wall
bracket for outdoor use and the other for indoor use. Attach the
appropriate wall bracket with the screws on the wall.
6. Open your wall dryer and spin the thread of the upper hinge into
the appropriate hole.
7. Then fasten it to the wall bracket. To do this, run the dryer from
the top down in the slot of the bracket.
8. Your wall dryer is now ready for use. To save space, you can
unscrew the screw counterclockwise again and fold the dryer.
Wall mounting & ttings
Important: Make sure that the plugs and screws are suitable for the
wall material. The accompanying dowels can be used for brick and
concrete. For aerated concrete blocks, lightweight walls are other
fasteners to choose. For timber designs, no plugs are required.
Please check always before drilling into the wall, that there are no
hidden cables, pipes, etc. at the drilling site. Please contact a quali-
ed craftsman, if you feel unsure to do the assembly yourself.
Notes
1. General rule: Always use larger screws and dowels, if you are
not sure.
2. Make sure you are using the correct drill bit that corresponds to
the wall material of the dowel and the size of the hole.
3. Please always drill horizontally. Please make sure that you do
not enlarge the hole using circular movements while drilling.
4. Make sure that the plugs are tight.
Care & Maintenance
In order to maintain this product properly, we advise you to clean it
with a soft sponge and some soapy water periodically. Never use
strong detergents or abrasives. Please check at regular intervals
the strength of the screws and dowels.
Security
Pay attention to your hands and ngers when you expand and col-
lapse the dryer. Ensure that you load the rods of the dryer evenly.
Any professional use, use under inappropriate conditions or devia-
ting from the instructions for handling the wall dryer is prohibited.
Never attempt to repair this item yourself. This is not a toy. Please
keep children away from it.
Importer: Casa Si GmbH, Obkirchergasse 36, 1190 Vienna, Austria
Návod k montáži a použití
Přečtěte si celý tento návod a uchovejte jej pro možnost pozdějšího
nahlédnutí.
1. Odstraňte obal.
2. Najděte pro umístění nástěnného sušáku (B) vhodné a pevné
místo na zdi. Jednou rukou uchopte držák (A) a druhou označte
na zdi místa, kde je třeba vyvrtat otvory. Pro zajištění vodorovné
pozice držáku doporučujeme použít vodováhu.
3. Po označení příslušných míst držák odložte a vyvrtejte do zdi 4
otvory.
4. Do každého vyvrtaného otvoru vložte hmoždinku.
5. K dispozici jsou dva nástěnné držáky. Jeden můžete namontovat
ven, druhý dovnitř do místnosti. Držák připevněte na zeď pomocí
šroubů.
6. Otevřete nástěnný sušák a zašroubujte závit horního kloubu do
k tomu určeného otvoru.
7. Potom sušák upevněte do držáku tak, že jej shora zasunete do
drážky v držáku.
8. Nyní je sušák připraven k použití. Chcete-li ušetřit místo, můžete
závit proti směru hodinových ručiček opět vyšroubovat a sušák
sklopit.
Montáž na zeď a upevnění
Důležité: Použité hmoždinky a šrouby musí být vhodné pro materiál,
ze kterého je zhotovena zeď. Hmoždinky, které jsou součástí bale-
ní, lze použít do cihel či betonu. Na plynobetonové tvárnice nebo
měkké zdi je případně třeba zvolit jiné upevňovací prostředky. U
dřevěných konstrukcí nejsou hmoždinky zapotřebí.
Než začnete vrtat do zdi, vždy zkontrolujte, zda se v daném místě
nenacházejí ukryté kabely, potrubí apod. Pokud si nejste jistí a na
montáž si netroufáte, obraťte se na kvalikovaného řemeslníka.
Upozornění
1. Všeobecná pravidla: Pokud si nejste jistí, používejte vždy větší
šrouby a hmoždinky.
2. Je nutné použít správný vrták odpovídající materiálu zdi, velikosti
hmoždinky a velikosti otvoru.
3. Vrtejte vždy vodorovně. Dejte pozor na to, abyste krouživými po-
hyby vrtáku nezvětšovali otvor.
4. Překontrolujte, zda hmoždinky pevně sedí.
Péče a údržba
Aby vám produkt dlouho vydržel, je potřeba jej pravidelně čistit
měkkou houbičkou namočenou v mýdlové vodě. Nepoužívejte ag-
resivní ani abrazivní čisticí prostředky. Pravidelně kontrolujte upev-
nění šroubů a hmoždinek.
Bezpečnost
Při vyklápění a sklápění sušáku dávejte pozor na ruce a prsty. Prá-
dlo po tyčích sušáku rozvěšujte rovnoměrně. Je zakázáno používat
sušák k profesionálním účelům a zacházet s ním nevhodně nebo v
rozporu s návodem k použití. Nikdy se nepokoušejte produkt sami
opravovat. Produkt není hračka. Udržujte jej mimo dosah dětí.
Dovozce: Casa Si GmbH, Obkirchergasse 36, 1190 Wien,
Rakousko
CZ
GB
(6 x 40 mm)(25,4 x 7,9 x 2,3 cm) (4,2 x 45 mm)
Balení obsahuje / mitgelieferte Teile / included parts
CHATDE
max.
18 kg
100 mm
300 mm
100 mm 20 mm130 mm

Zapojte se do konverzace o tomto výrobku
Zde můžete sdílet, co si myslíte o AquaPur IAN 106739 Sušák na prádlo. Máte-li dotaz, nejprve si pozorně přečtěte návod. Žádost o příručku lze provést pomocí našeho kontaktního formuláře.