Manuál Vango Kela III Stan

Potřebujete manuál pro svůj Vango Kela III Stan? Níže si můžete zdarma prohlédnout a stáhnout PDF manuál v češtině. Tento produkt má aktuálně 7 často kladené otázky, 0 komentářů a má 0 hlasů. Pokud toto není manuál, který chcete, kontaktujte nás.

Je váš výrobek vadný a manuál nenabízí žádné řešení? Přejděte do Repair Café a získejte opravu zdarma.
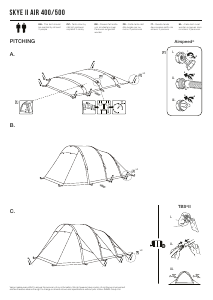
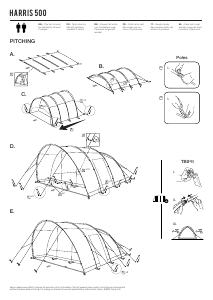
Manuál

Loading…

PITCHING INSTRUCTIONS KELA III (UK)
All - in - one pitching
Park your vehicle in the best location on your pitch ensuring that there is at least 4.6m free space at the side where you would like to
pitch your AirAway/Awning.
Unpack and position the AirAway in the required direction with the rear attachment section facing the vehicle side.
Attach the AirAway to your vehicle using one of the 4 available options:
Kador - The AirAway comes fited with a 6mm kador strip. This can be slid directly into a kador rail on the vehicle but Vango recomends using figure eight strips and an extra kador
adaptor (sold separately) to ensure the kador fits snuggly and to provide flexibility when driving the vehicle away whilst the AirAway is pitched.
Webbing Straps - Remove the supplied webbing straps from the peg bag and clip into the corresponding buckles on the rear of the AirAway roof. Pass the straps over the roof of the
vehicle and peg into the ground. Adjust the straps to fully tension the roof.
Hook & Loop Tabs - Use the pre-attached hook & loop tabs to connect to the roof bars of your vehicle.
Pole & Clamp - Slide the pole into the sleeve at the top of the rear section of the AirAway. Place the pole and fabric into the gutter on the vehicle and use the clamps to secure at both
ends and in the centre.
Peg out the rear corners of the attachment section of the AirAway/AirAwning at the base of the vehicle.
Pull the front pegging points of the AirAway away from the vehicle until the base of the flysheet is straight.
Peg out the four main corners of the AirAway using the pegs supplied
Locate inflation points on each beam
Remove the valve cap (figure 1)
Insert the correct pump adaptor, which will lock onto the valve
There is no need to turn the white valve button as the adaptor will move this to the correct position
Inflate all tubes to 7psi. The tubes MUST be guided into an arch as they are inflated
Final tube pressure MUST NOT exceed 8psi
DO NOT OVER-INFLATE THE BEAMS
Inflate all AirBeams to 7psi.
Start with the rear AirBeam and guide into an upright position whilst it is inflating
A small amount of air may leak from the valve when it is being inflated but this is normal
Remove the pump adaptor as soon as the beam is at the correct psi
Replace the valve cap to create an air tight seal
Repeat for front AirBeam
Peg out the remaining poles and pegging points using pin pegs at the base of the beams
Tighten the webbing adjusters to ensure that the AirAway is evenly tensioned all round.
Peg out ALL guy lines, ensuring that they are in line with the AirBeam or seam they are attached to.
Re-position and adjust tensioning where necessary.
Bracer AirBeam:
The AirAway is supplied with a short "Bracer" AirBeam. This AirBeam can be pumped up separately and attached to the hook and loop points at the top centre of the main AirBeams.
The Bracer AirBeam is slightly curved and should be attached to the main beams with the curve pointing upwards into the roof.
This Bracer AirBeam will increase the tension in the roof and will provide extra strength during poor weather.
Tension Band System:
Adjust the straps until they are taut
DO NOT OVERTENSION. Excess tension will alter the shape of the tent
Storm Straps:
When driving the vehicle away but leaving the AirAway up, Vango recommends using the supplied storm straps.
TO DEFLATE AIRBEAM/ AIRAWAY/ AIRAWNING:
To deflate the AirBeam (remove the cap (figure 7)) press & turn (figure 8) the button from CLOSED to OPEN
In the unlikely event of a puncture:
Deflate the air beam. Unzip the internal flysheet sleeve which contains the affected beam.
Remove the tube and its protective outer.
The zips for the protective outer are cable tied together to prevent accidental access. Cut the cable tie and open the zip.
DO NOT open these zips when the tube is inflated.
Remove the clear rubberised tube from the protective sleeve taking care when removing the valve from the sleeve.
Partially inflate the tube and pass through a bucket or basin of water, looking for air bubbles. This will indicate location of puncture
Use the repair patch provided and cover hole, using instructions on patch. Re-insert tube into protective outer, closing zip from both ends, so that zip pullers are in the flysheet sleeve
(this might be easier with the tube partially inflated)
AIRBEAM INFLATION:
AIRBEAM DEFLATION:
Aufbauanleitung Kela III (DE)
Komplettaufbau:
Parken Sie Ihr Fahrzeug an der besten Stelle auf Ihrem Stellplatz und achten Sie darauf, dass seitlich mindestens 3.5m frei sind, wo Sie Ihr AirAway/Awning aufstellen möchten.
Figure 1
Remove locking
cap
Figure 3
Lock locking pump
connector
Figure 4
Inflate with
AirBeam pump
Figure 5
Insert locking
cap
Figure 6
Lock locking cap
Figure 8
Push button to deflate & twist
to open position
Figure 7
Unlock locking
cap
Stáhnout manuál v český (PDF, 0.48 MB)
(Zvažte dopad na životní prostředí a tento manuál si vytiskněte pouze v případě, že výtisk skutečně potřebujete)

Loading…

Hodnocení

Ohodnoťte Vango Kela III Stan a dejte nám vědět, co si o výrobku myslíte. Chcete se podělit o své zkušenosti s tímto výrobkem nebo se na něco zeptat? Nechte nám ve spodní části stránky komentář.
Jste spokojeni s Vango Kela III Stan?
Ano Ne
Ohodnoťte tento výrobek jako první
0 hlasy

Zapojte se do konverzace o tomto výrobku

Zde můžete sdílet, co si myslíte o Vango Kela III Stan. Máte-li dotaz, nejprve si pozorně přečtěte návod. Žádost o příručku lze provést pomocí našeho kontaktního formuláře.

Více o tomto návodu

Chápeme, že je hezké mít k vašemu Vango Kela III Stan papírovou příručku. Manuál si můžete vždy stáhnout z našich webových stránek a vytisknout si jej sami. Pokud byste chtěli mít originální příručku, doporučujeme vám kontaktovat Vango. Možná by byli schopni poskytnout originální návod. Hledáte příručku ke svému Vango Kela III Stan v jiném jazyce? Vyberte si preferovaný jazyk na naší domovské stránce a vyhledejte číslo modelu, abyste zjistili, zda jej máme k dispozici.

Specifikace

Značka Vango
Modelka Kela III
Kategorie Stany
Typ souboru PDF
Velikost souboru 0.48 MB

Všechny návody pro Vango Stany
Další manuály Stany

Často kladené otázky o Vango Kela III Stan

Náš tým podpory vyhledává užitečné produktové informace a odpovídá na často kladené otázky. Pokud v nich najdete nějakou nepřesnost, kontaktujte nás prostřednictvím našeho kontaktního formuláře.

Mohu svůj stan uložit, když je mokrý? Ověřeno

Pouze na velmi krátkou dobu. Je-li stan skladován mokrý po dobu jednoho týdne nebo déle, může plesnivět. To je škodlivé pro váš stan a možná i pro vaše zdraví.

To bylo užitečné (384) Přečtěte si více

Jak mohu impregnovat stan? Ověřeno

Postavte stan, očistěte hadřík a nechte jej uschnout. Naneste impregnační prostředek na hadřík postřikovačem rostlin nebo jiným postřikem. Je také možné použít malířský váleček nebo štětec. Tkanina musí být plně nasycena impregnačním prostředkem. Ošetřete také vnitřek stanu. Všechna okna důkladně očistěte vlhkým hadříkem. Nenechte impregnační prostředek na něm zaschnout. Nechte stanový hadřík úplně vyschnout. V případě potřeby léčbu opakujte.

To bylo užitečné (285) Přečtěte si více

Mohu sám opravit slzu nebo otvor v plátně svého stanu? Ověřeno

Pro plátna ze syntetického stanu jsou k dispozici speciální kousky samolepících nášivek. Nalepte jednu z těchto náplastí na obě strany otvoru nebo ji roztrhněte. Pro bavlněná stanová plátna nebo plachty ze směsného materiálu je nejlepší použít nášivky, které lze nažehlit. To bude vyžadovat žehličku.

To bylo užitečné (218) Přečtěte si více

Zip mého stanu nebude fungovat hladce, co mám dělat? Ověřeno

Pokud zip běží hladce, použijte suchý sprej z PTFE nebo silikonový sprej. Nestříkejte na hadřík a preventivně stříkejte, abyste zabránili budoucím problémům.

To bylo užitečné (156) Přečtěte si více

Na vnitřní straně stanu jsou kapky vody, znamená to, že prosakuje? Ověřeno

Ne, to je pravděpodobně kondenzace. Zajistěte, aby byl stan řádně větrán, aby byla kondenzace co nejnižší.

To bylo užitečné (129) Přečtěte si více

Jaké stanové kolíky je nejlepší použít pro jaký povrch? Ověřeno

Na pastvinách nebo lesních površích můžete použít půlkruhové nebo plastové kolíky. Na skalnatém povrchu musíte použít skalní kolíky. Na hliněné povrchy můžete použít půlkruhové, plastové nebo univerzální kolíky. Na štěrkových plochách potřebujete půlkruhové nebo univerzální kolíky a na písku musíte použít dřevěné kolíky.

To bylo užitečné (105) Přečtěte si více

Impregnační prostředek zanechává na stanu plátěné bílé skvrny nebo bílý opar, co s tím mohu dělat? Ověřeno

Pokud prostředek zanechá bílý opar nebo bílé skvrny na látce stanu, znamená to, že jste na tato místa nanesli více impregnačního prostředku. To není škodlivé a skvrny často časem zmizí. Nedoporučuje se používat méně impregnačního prostředku, aby se zabránilo vzniku skvrn. Aby bylo dosaženo dobrých výsledků, je nutné látku plně nasáknout impregnačním prostředkem.

To bylo užitečné (97) Přečtěte si více
Manuál Vango Kela III Stan

Související produkty

Související kategorie