4 5
Use the last level, which is pleasant for you, during the subsequent epilation.
5. After the test, wait 24 hours and check for a skin reaction. If the skin looks normal, you can
proceed with the rst epilation. A patch test should be performed on all areas you are going
to treat.
Preparing the device
1. Remove the device and its accessories from the box.
2. Before starting treatment, make sure that the device is clean, dry and undamaged. You can
clean the epilation window.
3. Plug the adapter into an electrical outlet and then into the device.
4. The device is now ready for use.
Note: Before switching on, make sure that the lamp head is installed correctly.
Epilation
If the patch test is successful and your skin is prepared, you can start epilating.
1. Press the control button for 3 to 5 seconds to turn on the device.
2. At this point, the LED indicator should light up. You can see the following on the LED indicator:
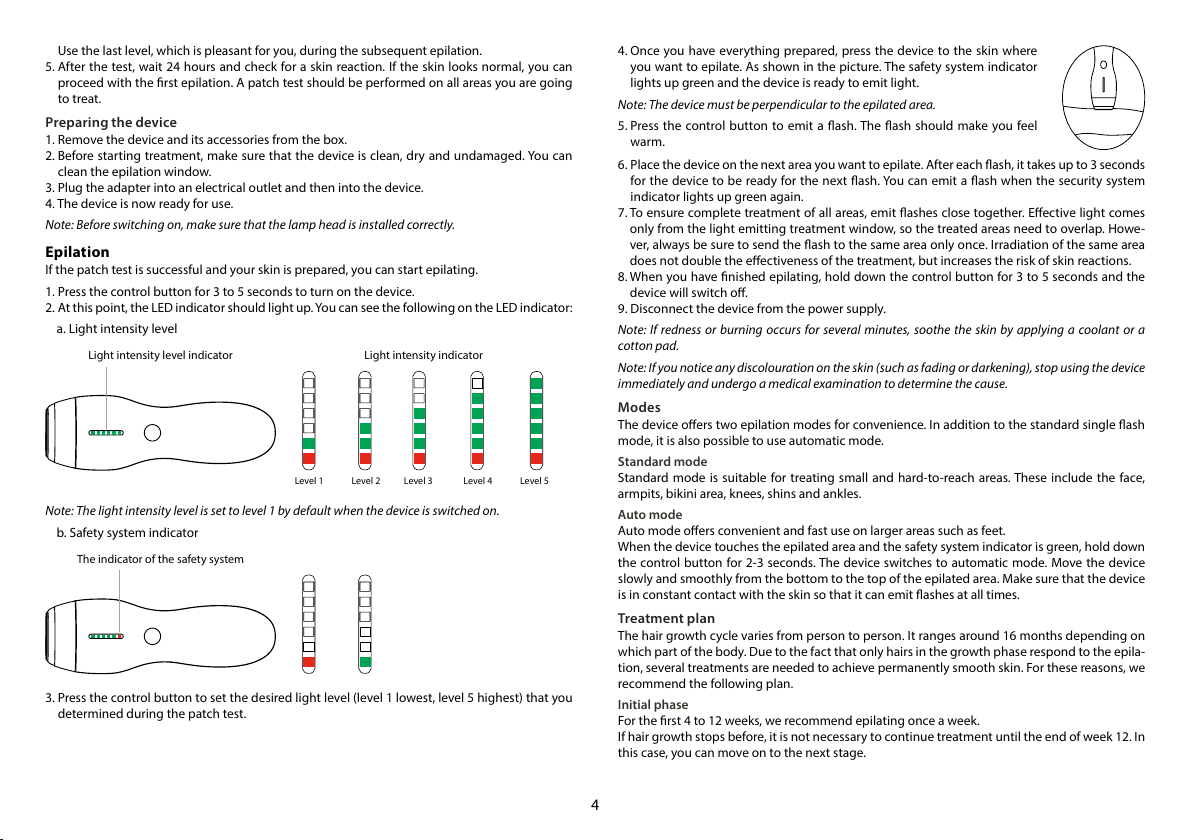
a. Light intensity level
Light intensity level indicator
Level 1 Level 2 Level 3 Level 4 Level 5
Light intensity indicator
Note: The light intensity level is set to level 1 by default when the device is switched on.
b. Safety system indicator
The indicator of the safety system
3. Press the control button to set the desired light level (level 1 lowest, level 5 highest) that you
determined during the patch test.
4. Once you have everything prepared, press the device to the skin where
you want to epilate. As shown in the picture. The safety system indicator
lights up green and the device is ready to emit light.
Note: The device must be perpendicular to the epilated area.
5. Press the control button to emit a ash. The ash should make you feel
warm.
6. Place the device on the next area you want to epilate. After each ash, it takes up to 3 seconds
for the device to be ready for the next ash. You can emit a ash when the security system
indicator lights up green again.
7. To ensure complete treatment of all areas, emit ashes close together. Eective light comes
only from the light emitting treatment window, so the treated areas need to overlap. Howe-
ver, always be sure to send the ash to the same area only once. Irradiation of the same area
does not double the eectiveness of the treatment, but increases the risk of skin reactions.
8. When you have nished epilating, hold down the control button for 3 to 5 seconds and the
device will switch o.
9. Disconnect the device from the power supply.
Note: If redness or burning occurs for several minutes, soothe the skin by applying a coolant or a
cotton pad.
Note: If you notice any discolouration on the skin (such as fading or darkening), stop using the device
immediately and undergo a medical examination to determine the cause.
Modes
The device oers two epilation modes for convenience. In addition to the standard single ash
mode, it is also possible to use automatic mode.
Standard mode
Standard mode is suitable for treating small and hard-to-reach areas. These include the face,
armpits, bikini area, knees, shins and ankles.
Auto mode
Auto mode oers convenient and fast use on larger areas such as feet.
When the device touches the epilated area and the safety system indicator is green, hold down
the control button for 2-3 seconds. The device switches to automatic mode. Move the device
slowly and smoothly from the bottom to the top of the epilated area. Make sure that the device
is in constant contact with the skin so that it can emit ashes at all times.
Treatment plan
The hair growth cycle varies from person to person. It ranges around 16 months depending on
which part of the body. Due to the fact that only hairs in the growth phase respond to the epila-
tion, several treatments are needed to achieve permanently smooth skin. For these reasons, we
recommend the following plan.
Initial phase
For the rst 4 to 12 weeks, we recommend epilating once a week.
If hair growth stops before, it is not necessary to continue treatment until the end of week 12. In
this case, you can move on to the next stage.


Zapojte se do konverzace o tomto výrobku
Zde můžete sdílet, co si myslíte o Truelife Belle IPL E3 Zařízení IPL. Máte-li dotaz, nejprve si pozorně přečtěte návod. Žádost o příručku lze provést pomocí našeho kontaktního formuláře.