4
Application menu
File
Photos Folder: set a directory for captured images.
Videos Folder: set a directory for recorded videos.
Options
Resolution: set image resolution.
Date/Time: hide or display date and time of capture during preview.
Language: change the language of the user interface.
XY Guide: hide or display a grid on images.
Full screen mode: go full screen.
Capture
Photo: capture an image.
Video: record a video.
Capturing an image
Click the corresponding icon on the toolbar or select Photo from the Capture menu.
Recording a video
Click the corresponding icon on the toolbar or select Video from the Capture menu.
Sequence capture
Click the corresponding icon on the toolbar. A dialog window will appear where you can
set a number of parameters for sequence capture. Click the Photo radio button to set the
time to begin capturing images, interval between them and the total number of images.
Click the Video radio button to set the time to begin recording videos, their duration,
interval between them and the total number of clips.
Calibration
Before calibrating the microscope, turn the grid display on. To do so, select On from
Options > XY Guide. By default, the grid is visible. Place the calibration scale on the stage
and focus your view. Make sure that the vertical axis of the grid is parallel to scale divisions
and capture an image. Double-click the image thumbnail to open it in a separate window.
Click the corresponding icon on the toolbar to begin calibration. Using your mouse,
choose two points on the image (you have to know the actual distance between these two
points). Once you choose the second point, a dialog window will open, where you have to
enter the known distance in the Actual dimension eld. The application will automatically
calculate the magnication of the image. Click OK to close the dialog window. The
calculated magnication will be displayed in the Magnication eld.
Note: Chosen points should form a horizontal line.
You can check calibration results by measuring the same distance with the Straight line tool.
Click the measurements icon, choose the Straight line tool and draw a similar line on the
image. If the measured distance is equal to the actual distance, calibration has been successful.
Recalibration
The calibration process has to be repeated if the magnication or focus has been changed
during observations.
Click the corresponding icon on the toolbar again and select Reset picture magnication
from Reset magnication. Repeat the calibration process, as described above. Change the
magnication and capture a few images. Double-click one of the thumbnails to open the
resulting image in a preview window. Click the calibration icon on the toolbar and select
Set picture magnication from Set magnication. Enter the current magnication in the
dialog window that appears and click OK.
If you want to use the same magnication when capturing images in the future, click the
calibration icon on the toolbar and select Set capture magnication from Set magnication.
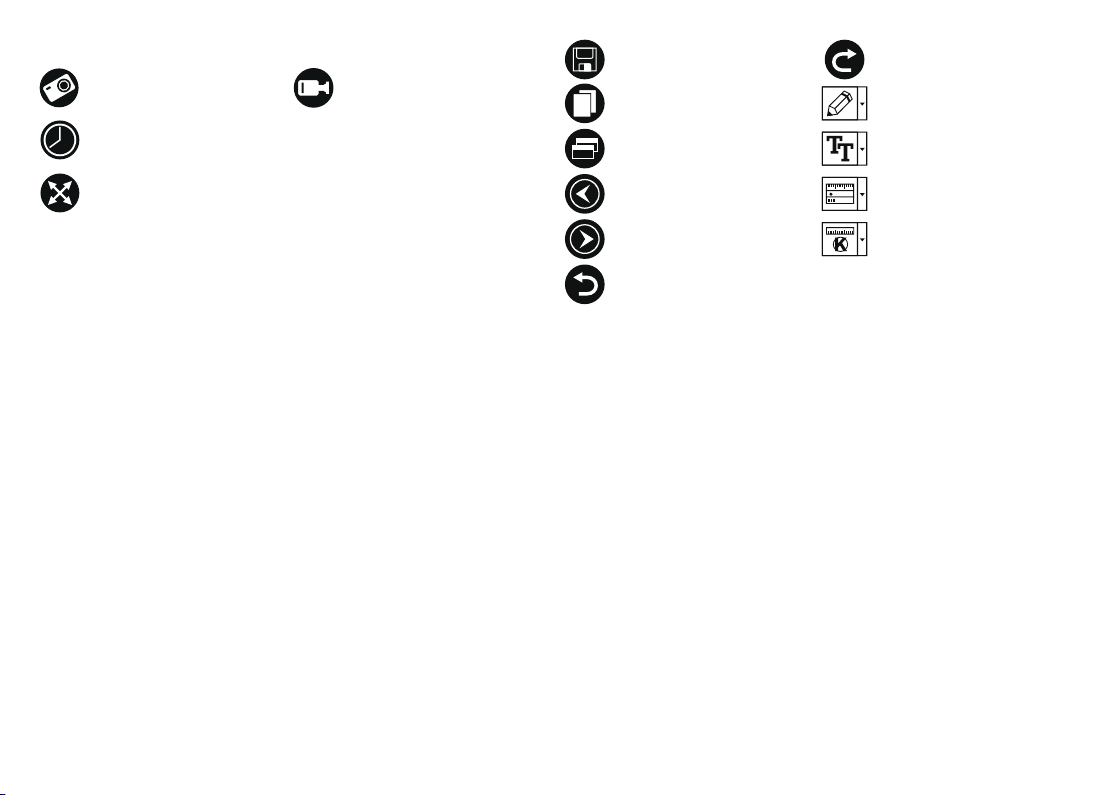
Capture an image
Start and stop video
recording
Sequence capture (you can set the time to begin capturing images or videos,
interval between them, video duration and the number of images or videos
to be captured)
Full screen mode. To exit full screen mode, press Escape on your keyboard
or double-click anywhere on the screen
Save as
Copy to clipboard
Copy le
Previous image
Next image
Repeat the last action
Draw
Text
Measurement
Calibration
Undo the last action


Zapojte se do konverzace o tomto výrobku
Zde můžete sdílet, co si myslíte o Levenhuk DTX 700 LCD Mikroskop. Máte-li dotaz, nejprve si pozorně přečtěte návod. Žádost o příručku lze provést pomocí našeho kontaktního formuláře.