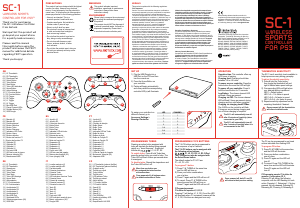
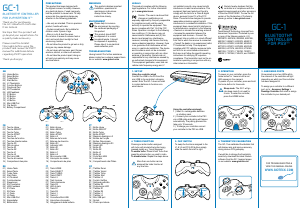
LED CHANNEL
1 1
2 2
3 3
4 4
1+4 5
2+4 6
3+4 7
03
01
04 05 06
08
11
18 18
19
10
07
09
02
15
13
12
14
16
17
02
01
.
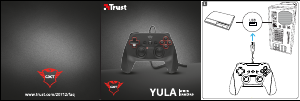
Once powered off, both F1 and F2
will return to their previous setting.
The F2 can be programmed to run timed
actions indicated via a ashing LED.
To program F2 button:
1) Press F2 & TURBO at the same time
and the LED will illuminate.
2) Press your button combinations
one at a time.
3) Press F2 again and the LED will
turn off.
4) To cancel: Press F2 & TURBO at the
same time and the LED will illuminate.
Press F2 again and the LED will
turn off.
F2 Programming example: F2 to deliver the
sequence L1, action pause, R2, O
Pressing F2 will deliver the following
sequence; with the LED ashing for each
action: Pressing L1, Releasing L1, No key
pressed, No key released, Pressing R2,
Releasing R2, Pressing O, Releasing O.
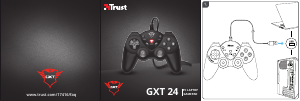
PROGRAMMING F1/F2 BUTTONS
The F1 & F2 buttons can be programmed to
run a sequence of up to 8 actions.
The F1 & F2 buttons can be assigned with
the following action buttons:
, , , , L1, L2, R1, R2, L3, R3, D-Pad.
The F2 button can also be assigned with
the Select/Pause button.
The default modes for F1 & F2 are:
F1 = L3, F2 = R3.
To program F1 button:
1) Press F1 & TURBO at the same time
and the LED will turn on.
2) Press your button combinations
one at a time.
3) Press F1 again and the LED will turn off.
4) To cancel: Press F1 & TURBO at the
same time and the LED will turn on.
Press F1 again and the LED will turn off.
F1 Programming example:
F1 to deliver the sequence L1, X, R2, O
Pressing F1 will deliver L1, X, R2, O and the LED
will illuminate when F1 is pressed, however all the
L1, X, R2, O buttons are assigned once only.
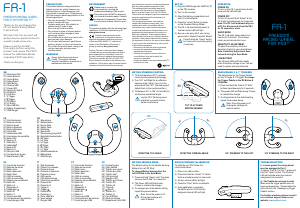
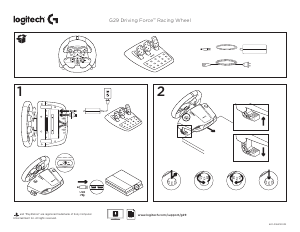
SeT UP
1) Plug the USB Dongle into a
USB Port on the PS3 and then
turn the console on.
2) Press the Home Button on
your controller.
3) Pairing will begin automatically
and once paired the corresponding
controller LED(s) will illuminate.
leGAlS
This product complies with the following regulations.
wARNINGS
This symbol indicates important
installation, operational or maintenance
instructions. Always follow these
instructions closely.
eNvIRONMeNT
Please help to conserve the environment
by recycling the cardboard packaging of
this product.
This product should NOT be disposed of
in normal household waste. It should be
disposed of separately. Please take it
to an electrical waste collection point.
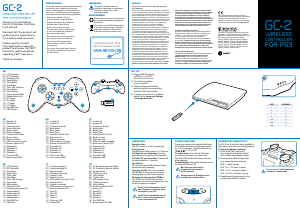
PROGRAMMING TURBO
Pressing an action button assigned with
turbo will simulate the button being pressed
rapidly e.g. “boost repower”. Supported
buttons are , , , , L1, L2, R1, R2
To enable turbo: Press & hold Turbo then
press the action button you wish to turbo. The
Turbo LED will ash 8 times per second when
it is assigned.
To disable turbo: Repeat the steps above and
the Turbo LED will turn off.
More than one button can
be assigned the turbo function
at the same time.
Once powered off, all buttons return
to default mode without Turbo.
OPeRATION
Operation time: This controller offers up
to 25 hours of gaming.
Charging time: Charging should take
between 3.5 to 4.5 hours.
To power on your controller: Press the
home button once and the LED will light.
To power off your controller: Press &
hold the home button for 10 seconds.
Low Battery: The chosen channel LED
will ash 4 times per second.
Charging via PS3: The chosen channel
LED will ash 2 times per second during
charging and turn solid when complete.
Charging via charging dock/PC/Mac:
The 4 LEDs on the controller will ash
2 times per second during charging and
turn off when charging is complete.
The SC-1 will automatically turn off
after 10 minutes of inactivity (when
connected to your PS3).
The SC-1 will automatically turn off
after 1 minute of inactivity when it is
not connected to the PS3.
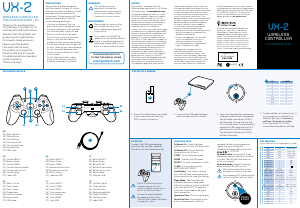
THUMBSTICK SeNSITIvITY
The SC-1 has 4 sensitivity levels available to
help improve accuracy during gameplay.
To adjust thumbstick sensitivity:
1) Press & hold the Turbo button,
then toggle the thumbstick left and
right to obtain faster speed settings.
2) Corresponding LEDs will light when
your desired setting is achieved:
LED 1 = Default speed
LED 1+2 = 1.5x faster in speed
LED 1+2+3 = 2x faster in speed
LED 1+2+3+4 = 4x faster in speed
3) Repeat sensitivity adjustment on the
remaining thumbstick if desired.
Once powered off, the thumbsticks
will return to default mode.
SC
-
1
GB
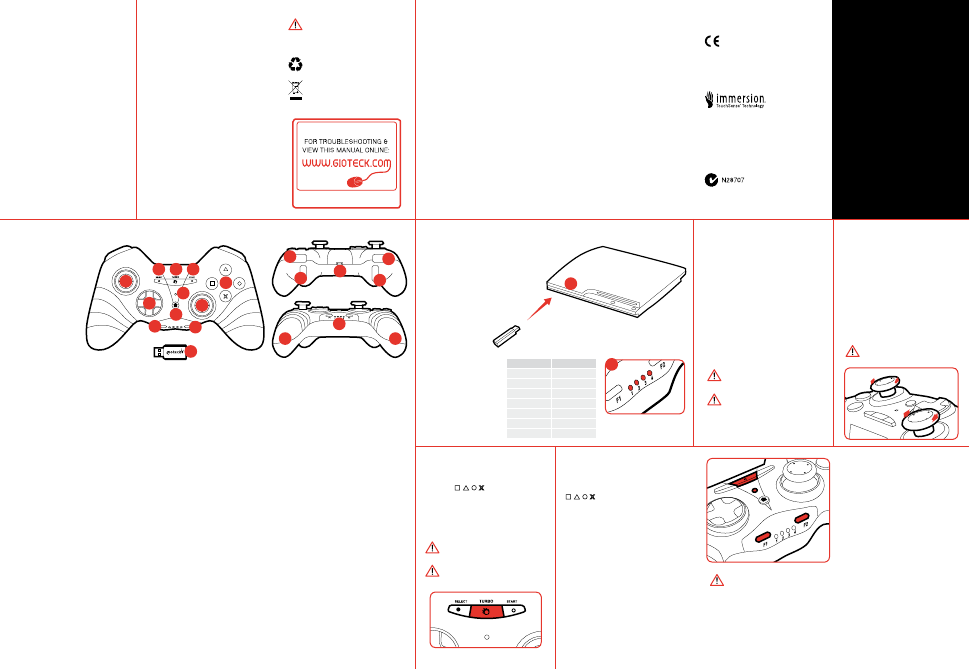
01 | L3 Thumbstick
02 | R3 Thumbstick
03 | Directional Pad
04 | Select Button
05 | Turbo Button
06 | Start Button
07 | Turbo LED Indication
08 | Home Button
09 | Action Buttons
10 | F1 Function Button
11 | F2 Function Button
12 | R1 Trigger
13 | R2 Trigger
14 | L1 Trigger
15 | L2 Trigger
16 | Mini-USB Port
17 | Player Channel LEDs
18 | Rumble Motors (X2)
19 | USB Dongle
eS
IT
01 | Joystick L3
02 | Joystick R3
03 | Control de dirección
04 | Botón Select
05 | Botón Turbo
06 | Botón Start
07 | Indicador LED del turbo
08 | Botón de inicio
09 | Botones de acción
10 | Botón de función F1
11 | Botón de función F2
12 | Disparador R1
13 | Disparador R2
14 | Disparador L1
15 | Disparador L2
16 | Puerto mini USB
17 | LED de canal del jugador
18 | Motores de vibración (X2)
19 | Llave (dongle) USB
01 | Levetta analogica L3
02 | Levetta analogica R3
03 | Pad direzionale
04 | Pulsante di selezione
05 | Pulsante Turbo
06 | Pulsante di avvio
07 | LED indicatore funzione Turbo
08 | Pulsante Home
09 | Pulsanti di comando
10 | Pulsante funzione F1
11 | Pulsante funzione F2
12 | Tasto R1
13 | Tasto R2
14 | Tasto L1
15 | Tasto L2
16 | Porta mini USB
17 | LED indicatori canale di gioco
18 | Motori a vibrazione (X2)
19 | Dongle USB
PT
CZ
01 | Joystick L3
02 | Joystick R3
03 | Controlo de direção
04 | Botão Select
05 | Botão Turbo
06 | Botão Start
07 | Indicação LED de Turbo
08 | Botão de Início
09 | Botões de Ação
10 | Botão de Função F1
11 | Botão de Função F2
12 | Disparador R1
13 | Disparador R2
14 | Disparador L1
15 | Disparador L2
16 | Porta Mini USB
17 | LEDs de Canal de Jogador
18 | Motores de Vibração (X2)
19 | Adaptador USB
01 | L3 Thumbstick (palcové tlačítko)
02 | R3 Thumbstick (palcové tlačítko)
03 | Ovladač směru
04 | Tlačítko pro výběr
05 | Turbo tlačítko
06 | Tlačítko start
07 | LED indikace Turbo
08 | Tlačítko pro návrat
09 | Akční tlačítka
10 | F1 Funkční tlačítko
11 | F2 Funkční tlačítko
12 | Spoušť R1
13 | Spoušť R2
14 | Spoušť L1
15 | Spoušť L2
16 | Port USB Mini
17 | Kanálové indikátory LED
18 | Motory (X2)
19 | Bezpečnostní klíč USB
FR
De
01 | Manette L3
02 | Manette R3
03 | Pad directionnel
04 | Bouton Sélection
05 | Bouton Turbo
06 | Bouton Démarrer
07 | Indicateur LED Turbo
08 | Bouton Home
09 | Boutons d'action
10 | Bouton de fonction F1
11 | Bouton de fonction F2
12 | Gâchette R1
13 | Gâchette R2
14 | Gâchette L1
15 | Gâchette L2
16 | Port mini-USB
17 | LED de la voie du joueur
18 | Moteurs vibrants (X2)
19 | Branchement USB
01 | L3 Thumbstick
02 | R3 Thumbstick
03 | Steuerkreuz
04 | Select-Taste
05 | Turbo-Taste
06 | Start-Taste
07 | Turbo LED-Anzeige
08 | Home-Taste
09 | Aktionstasten
10 | F1 Funktionstaste
11 | F2 Funktionstaste
12 | Auslösetaste R1
13 | Auslösetaste R2
14 | Auslösetaste L1
15 | Auslösetaste L2
16 | Mini-USB Port
17 | Spielkanal-LEDs
18 | Schwingungsmotoren (X2)
19 | USB-Stick
PReCAUTIONS
This product has been designed with the highest
concern for safety. However, any electrical
device, if used improperly, has the potential to
cause harm. To help ensure risk-free operation
please pay attention to the following guidelines.
• Use only as intended. This is a
precision product, handle with care.
• Contains small parts. Not suitable for
children under 3 years of age.
• Store in a dry & dust free area.
Do not store in areas of extreme heat
or cold, and avoid direct sunlight or
heat sources eg. heaters.
• Do not allow the product to get wet or
dirty; doing so may cause damage.
• Do not clean with benzene, paint
thinner, acetone, alcohol, or other
such solvents.
• Do not take the product apart; doing so
will void your warranty and may cause
electrical shock.
Thank you for purchasing
the SC-1 Wireless Controller
from Gioteck.
We hope that this product will
go beyond your expectations
for a quality made accessory.
Please read this manual
thoroughly before using the
product and review the PS3™
manual for additional details
regarding PS3™ operation.
Thank you & enjoy!
WIRELESS SPORTS
CONTROLLER FOR PS3™
To assign your controller to a
different channel, go to:
Accessory Settings >
Reassign Controller.
Gioteck hereby declares that this controller is in
compliance with the essential requirements and other
provisions of Directive 2004/108/EC and R&TTe
1999/5/EC. To view the full version of the Declaration
of Conformity please go online to doc.gioteck.com
TouchSense Technology Licensed from Immersion
Corporation. TouchSense Technology for Spinning
Mass Tactile Feedback Devices protected by one or
more of the following United States Patents:
5831408, 5844392, 5857986, 5907487, 5959613,
6020875, 6088017, 6104158, 6246390, 6252583,
6271833, 6275213, 6278439, 6343349, 6400352,
6411276, 6424333, 6715045, 6801008, 7131073,
7199790, 7209117, 7299321, 7327348, 7345672,
7502011 and other patents pending.
FCC Statement
Caution: The user is cautioned that changes or modications
not expressly approved by the party responsible for compliance
could void the user’s authority to operate the equipment.
This device complies with Part 15 of the FCC Rules. Operation
is subject to the following two conditions: (1) this device may not
cause harmful interference,and (2) this device must accept any
interference received, including interference that may cause
undesired operation. However, there is no guarantee
that interference will not occur in a particular installation.
The device and its antenna must not be co-located or
operating in conjunction with any other antenna or transmitter.
Gioteck are not responsible for any interference caused by
un-authorized changes to this equipment. This equipment
generates, uses, and can radiate radio frequency energy and,
if not installed correctly, may cause harmful interference to radio
communications. This equipment has been tested and found
to comply with the limits for a Class B digital device, pursuant
to part 15 of the FCC Rules. These limits are designed to
provide reasonable protection against harmful interference in
a residential installation. If this equipment does cause harmful
interference to radio/television reception try the following:
• Reorient or relocate the receiving antenna. • Increase the
separation between the equipment and receiver. • Connect
the equipment into an outlet on a circuit different from that
to which the receiver is connected. • Consult the dealer or
an experienced radio/TV technician for help. This equipment
complies with FCC radiation exposure limits set forth for an
uncontrolled environment. End user must follow the specic
operating instructions for satisfying RF exposure compliance.
This transmitter must not be co-located or operating in
conjunction with any other antenna or transmitter. / Le présent
appareil est conforme aux Partie 15 des règlements de la FCC et CNR
d’Industrie Canada applicables aux appareils radio exempts de licence.
L’exploitation est autorisée vaux deux conditions suivantes : (1) l’appareil
ne doit pas produire de brouillage, et (2) l’utilisateur de l’appareil doit
accepter tout brouillage radioélectrique subi, même si le brouillage
est susceptible d’en compromettre le fonctionnement. Cet appareil est
conforme aux limites d’exposition au rayonnement RF stipulées par la FCC
et IC pour une utilisation dans un environnement non contrôlé. L’utilisateur
nal doit suivre les instructions de fonctionnement spéciques pour le
respect d’exposition aux RF. Lesémetteurs ne doivent pas être placées près
d’autres antennes ou émetteurs ou fonctionner avec ceux-ci.
Canadian Compliance Statement
This device complies with Industry Canada license-exempt
RSS standard(s). Operation is subject to the following two
conditions: (1) this device may not cause interference, and (2)
this device must accept any interference, including interference
that may cause undesired operation of the device./ Cet appareil
est conforme aux norms CNR exemptes de licence d’Industrie Canada.
Le fonctionnement est soumis aux deux conditions suivantes: (1) cet
appareil ne doit pas provoquer d’interférences et (2) cet appareil doit
accepter toute interférence, y compris celles susceptibles de provoquer un
fonctionnement non souhaité de l’appareil.
Industry Canada Statement
Complies with the Canadian ICES-003 Class B specications.
/ Cet appareil numérique de la classe B est conforme à la norme
NMB-003 du Canada. This device complies with RSS 210
of Industry Canada. This Class B device meets all the
requirements of the Canadian interference-causing equipment
regulations. / Cet appareil numérique de la Classe B respecte toutes
les exigences du Règlement sur le matériel brouilleur du Canada.
SC
-
1
WIRELESS
SPORTS
CONTROLLER
FOR PS3


Zapojte se do konverzace o tomto výrobku
Zde můžete sdílet, co si myslíte o Gioteck SC-1 (PS3) Herní ovladač. Máte-li dotaz, nejprve si pozorně přečtěte návod. Žádost o příručku lze provést pomocí našeho kontaktního formuláře.
odpověď | To bylo užitečné (1) (Přeloženo Googlem)