GB GB
GB GB GB GB GB GB GB GB GB GB
GB GB GB GB GB GB GB GB GB GB
GB GB GB GB SISISI
SI
STPWATCH: štoparica
Pritisnite tipko SET za zagon štoparice.
Še enkrat pritisnite tipko SET, da štoparico
zaustavite.
Pritisnite tipko SET in jo držite pritisnjeno, da
štoparico prestavite nazaj na 0.
CAL RATE: trenutna poraba kalorij
CALORIE: števec kalorij
Pritisnite tipko SET in jo držite pritisnjeno, da
števec kalorij prestavite nazaj na 0.
FAT-BURN: zgorevanje maščobe v gramih
Pritisnite tipko SET in jo držite pritisnjeno, da
prikaz zgorevanja maščob prestavite nazaj na 0.
KM: števec kilometrov
Pritisnite tipko SET in jo držite pritisnjeno, da
lahko nastavite števec kilometrov.
Na LC-zaslonu
7
se pojavi simbol za števec
naprej oz. števec nazaj (+ oz. -). Sedaj tako
pogosto pritisnite tipko MODE
11
, da se
prikaže vaš želeni simbol.
baterijo, je treba takoj poiskati zdravniško
pomoč.
Iz naprave odstranite baterijo, če izdelka dlje
časa ne uporabljate.
PREVIDNO! NEVARNOST
EKSPLOZIJE! Baterij nikoli
ponovno ne polnite!
PREVIDNO! NEVARNOST
EKSPLOZIJE! Vedno zamenjajte
vse baterije istočasno in uporabljajte
samo baterije enakega tipa.
Iztrošeno baterijo takoj odstranite iz naprave.
Obstaja velika nevarnost iztekanja!
Pri vstavljanju pazite na pravilno polarnost!
Baterijo hranite izven dosega otrok, ne vrzite je
v ogenj, ne povzročite kratkega stika baterije
in je ne razstavljajte.
Če bi baterija v vaši napravi iztekala, jo takoj
vzemite ven, da preprečite škodo na napravi!
SISI
Problem Solution
Empty LC-display or no
response after putting
the battery in again
RESET
Remove battery. In the
area marked RESET of
the battery compartment,
touch the plus and minus
terminals at the same
time using a screwdriver.
Insert a 3V battery into
the battery compartment
in such a way
that the +
terminal points upwards.
Replace the battery cover
on the battery compart-
ment. The microprocessor
is reset and restarted.
reactivate the computer. The function indicator
8
shows the current mode.
Press the MODE button
11
repeatedly to
page through the various modes.
Press the SET button
13
to change into the sec-
ondary function for any function.
Press the SET button and keep it pressed to call
or reset up any saved values.
The bike computer has the following
functions:
Advanced users’ functions:
CLOCK > TOTALODO > TOTAL-TM >
TRIPDIST >
MAXSPEED
> AVGSPEED > TRIPTIME > TEMP >
STPWATCH >
CAL RATE > CALORIE > FAT-BURN >
KM+/- > TIME+/- > SCAN
Beginners’ functions:
TRIPDIST > AVGSPEED > TRIPTIME
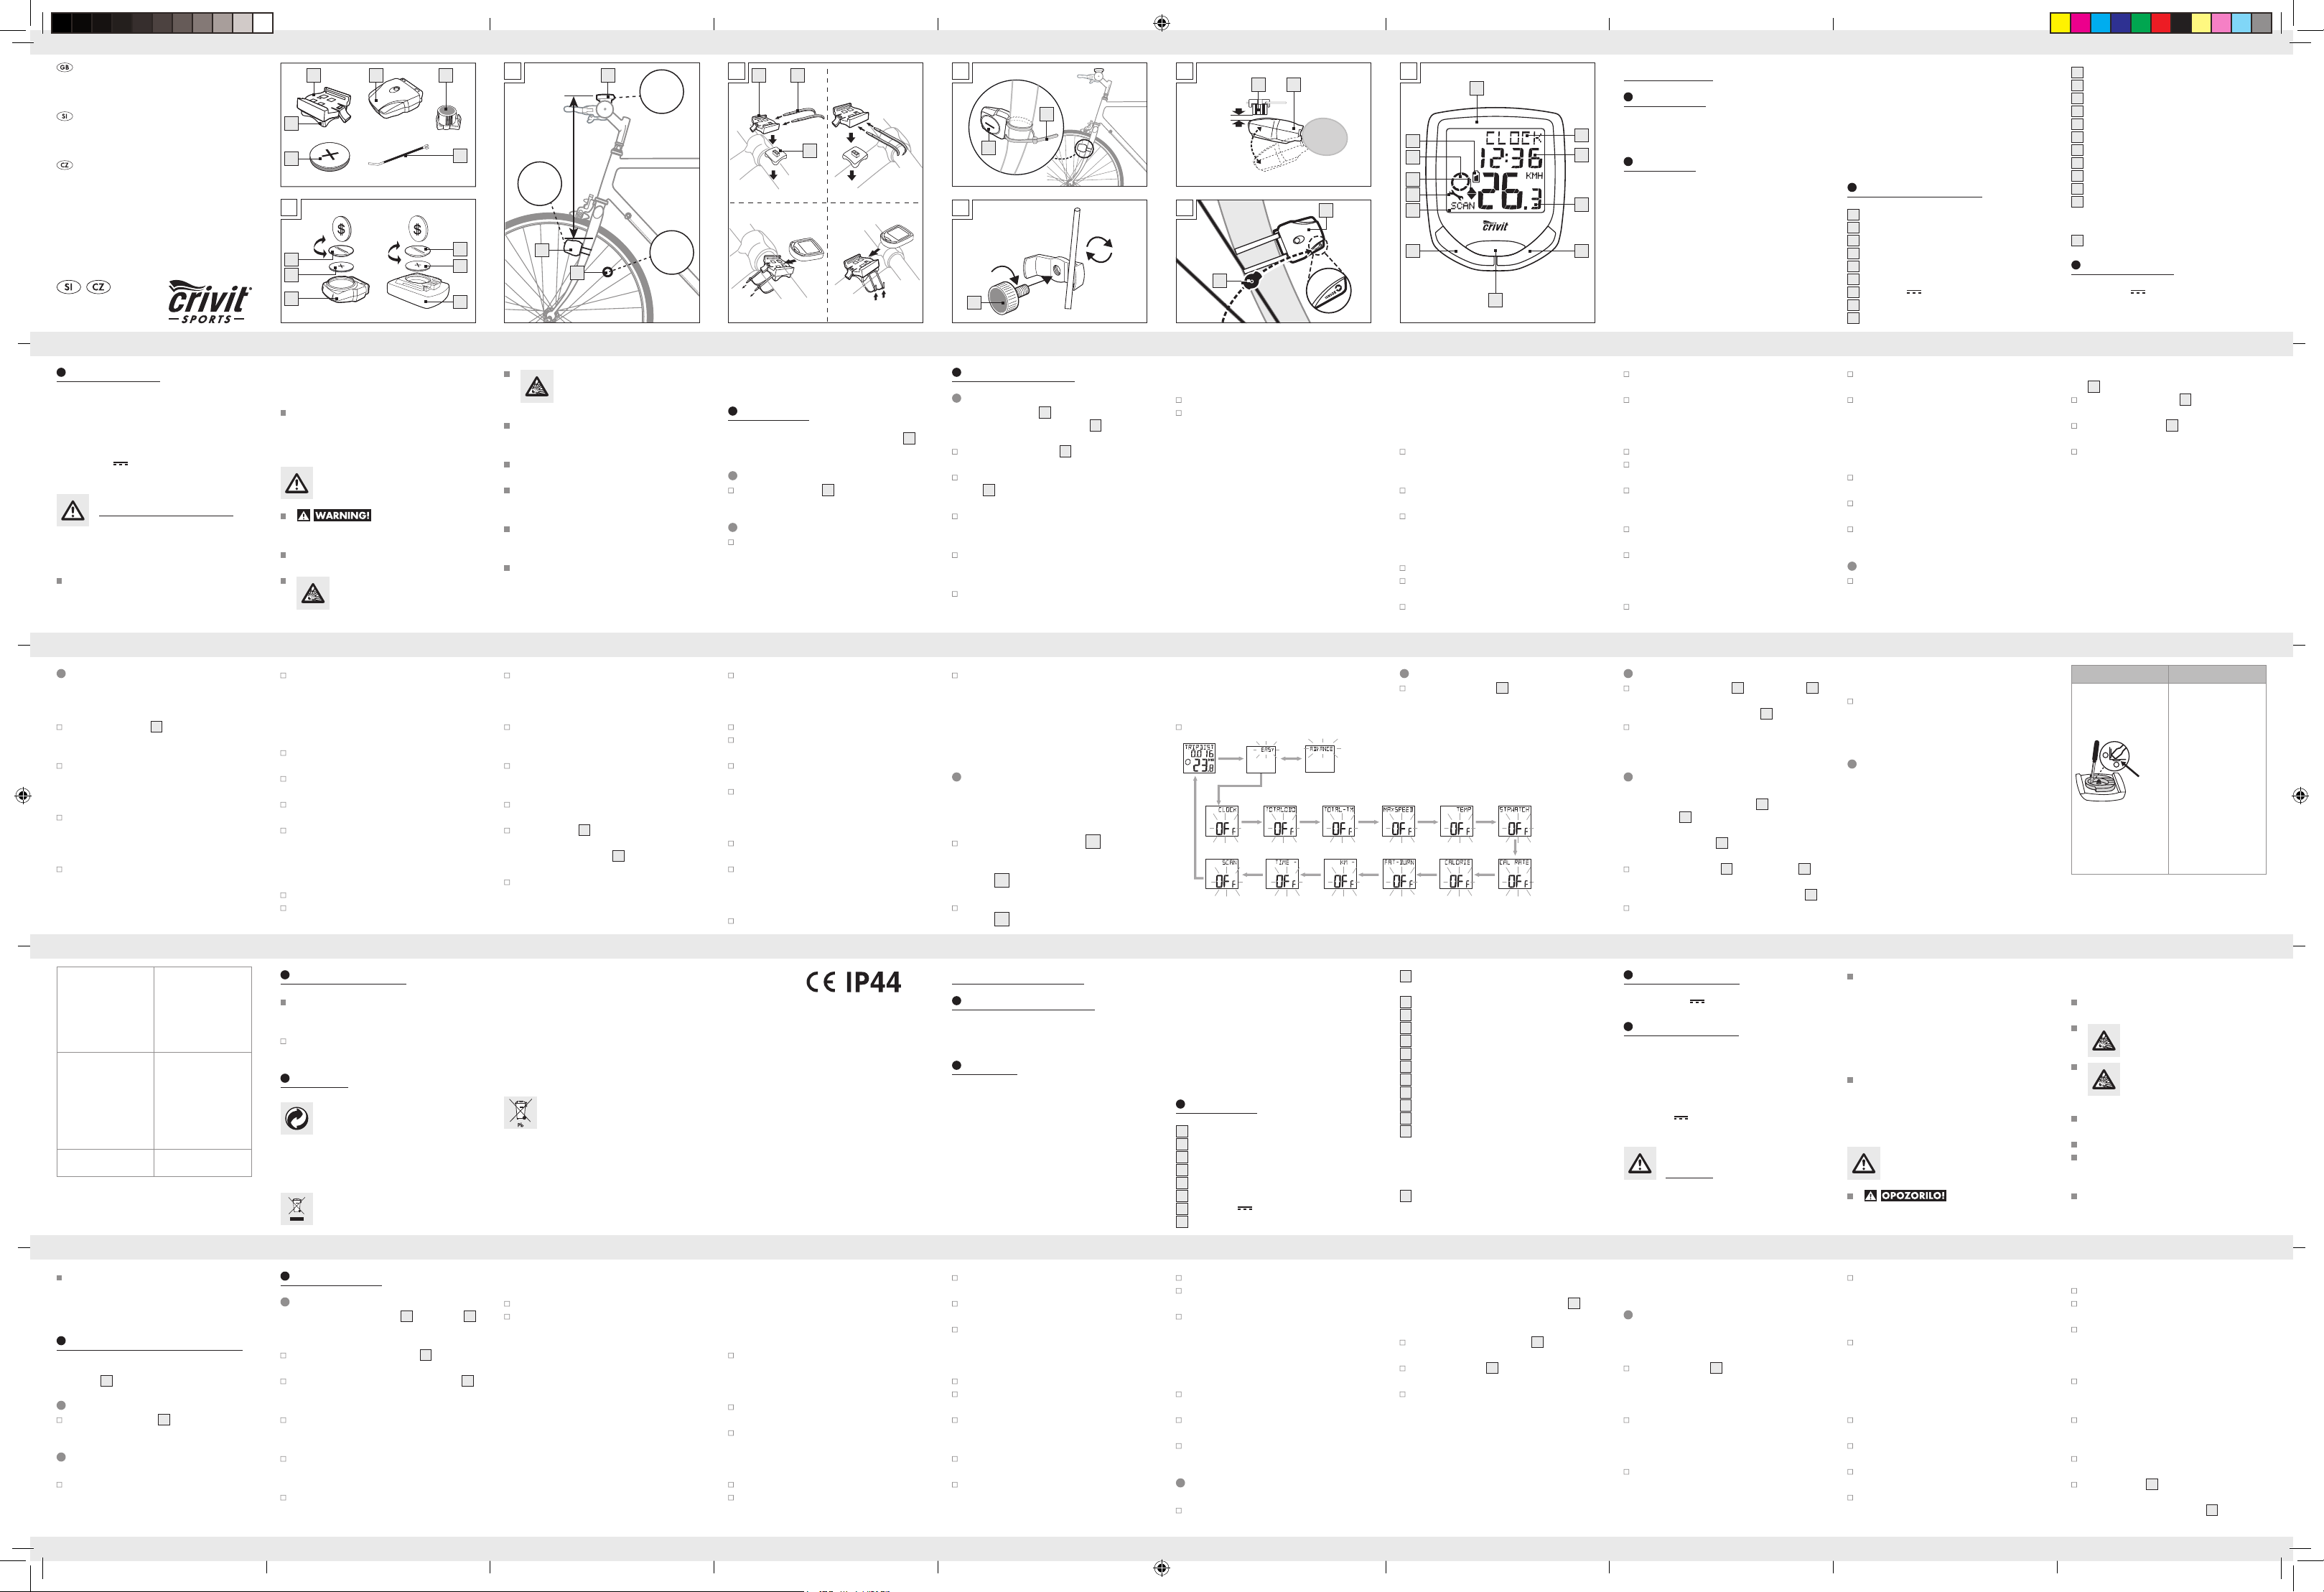
7
LC display
8
Function indicator
9
Secondary function value display
10
Primary function value display
11
MODE button
12
Light button
13
SET button
14
SCAN indicator
15
Servicing interval indicator
16
Speed comparison indicato
r
17
Acceleration / deceleration indicator:
Acceleration – anticlockwise
rotation
Decelerat
ion – clockwise rotation
18
Battery state indicator
Technical data
Battery: 3 V (CR2032 button cell)
GB
SI SI SI SI SI SI SI SI SI
SI
– Odometer (countdown or forwards)
– Total odometer and total cycling time display
– Calories
– Fat-burning
– Scan indicator (functions displayed in
continuous loop)
– Automatic switch to clock mode
– Backlight
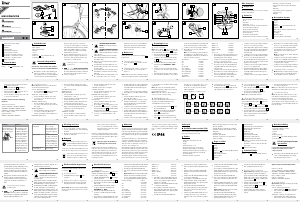
Description of parts
1a
Bracket
1b
Bracket cushion plate
2a
Sensor
2b
Sensor battery compartment cover
3
Magnet
4
Cable tie
5
Battery 3 V , type CR2032 button cell
6a
Bike computer
6b
Bike computer’s battery compartment cover
Included items
1 Bike computer
1 Bike computer bracket
1 Magnet
1 Sensor
4 Cable ties
2 Batteries 3 V
, type CR2032 button cell
1 Operating instructions
General safety advice
KEEP ALL THE SAFETY ADVICE AND INSTRUC-
TIONS IN A SAFE PLACE FOR FUTURE REFERENCE!
Children or persons who lack the knowledge or
experience to use the device or whose physical,
sensory or intellectual capacities are limited must
never be allowed to use the device without
supervision or instruction by a person responsible
for their safety. Children must be supervised so
that they do not play with the product.
Please note that the warranty does not cover
damage arising from improper treatment, non-
observance of the operating instructions and
safety advice or unauthorised use.
Safety advice concerning
batteries
RISK OF LOSS OF LIFE!
If batteries are swallowed, it can lead to loss of
life. Seek medical attention if a battery is swal
lowed.
Remove the battery if the product is not to be
used for a long period.
CAUTION! RISK OF EXPLO-
SION! Never recharge single-use
batteries!
CAUTION! DANGER OF EXPLO-
SION! Always replace all batteries
at the same time and only use batte
ries
of the same type.
If the battery is exhausted, remove it from the
device immediately. Otherwise the battery is
more likely to leak.
Make sure you insert the battery the right way
round (polarity).
Keep the battery away from children. Do not
throw the battery into a fire. Never short-circuit
it or take it apart.
If your battery leaks, remove it from the device
immediately to prevent the device from being
damaged.
Do not let the fluid from a leaking battery come
into contact with your skin, eyes or mucous
membranes. In the event of contact with fluid
leaking from a battery, thoroughly flush the
affected area with water and / or seek the
advice of a doctor!
Before use
Remove the protective foil from the LC display
7
before first use.
Inserting the battery
To insert the battery
5
, proceed as shown in
Fig. A.
Attaching the bike computer
To attach the device, proceed as shown in
Figs. B to G.
Preparing for use
Basic settings
Note: The LC display
7
comes on automatically
approx. 2 seconds after the battery
5
is inserted.
You are immediately offered a choice of languages.
Press the MODE-button
11
repeatedly until the
desired language appears.
Confirm your choice by pressing the SET but-
ton
13
. You move on automatically to select
the user profile.
Press the MODE button repeatedly until the
desired
user profile (ADVANCE or EASY)
appears.
Confirm your choice by pressing the SET but-
ton. Now you can choose the wheel size (SET
WS).
A four-digit number appears in the LC display.
Now enter the tyre circumference of your wheel
in mm. Press the MODE button repeatedly until
the desired number appears as the first digit.
Confirm your choice by pressing the SET button.
Repeat this process for each of the three
remaining digits.
Note: You can calculate your tyre
circumference
by multiplying your
tyre diameter by 3.1416.
The following list contains the tyre circumfer
ences
of the most common cycle tyres.
Tyre diameter Tyre circumference
20” 1598 mm
22” 1759 mm
24” 1916 mm
26” (650 A) 2073 mm
26.5” (tubular) 2117 mm
26.6” (700x25C) 2124 mm
26.8” (700x28C) 2136 mm
27” (700x32C) 2155 mm
28” (700B) 2237 mm
ATB24”x1.75 1888 mm
ATB26 x1.4 1995 mm
ATB26 x1.5 2030 mm
ATB26 x1.75 2045 mm
ATB26x2 (650B) 2099 mm
27”x1 2138 mm
27”x1 1 / 4 2155 mm
Now select your desired unit of distance. Press
the MODE button repeatedly until SET KM or
SET MILE appears in the LC display.
Confirm your choice by pressing the SET button.
You move on to entering your age.
A two-digit number appears in the LC display.
Now enter your age. Press the MODE button
repeatedly until the desired number appears
as the first digit.
Confirm your choice by pressing the SET butto
n.
Repeat this process for the remaining digit. You
move on to selecting the unit of weight.
Press the MODE button repeatedly until SET
KG or SET LB appears in the LC display.
Confirm your choice by pressing the SET button.
You move on to entering your weight.
A three-digit number appears in the LC display.
Now enter your weight. Press the MODE button
repeatedly until the desired number appears
as the first digit.
Confirm your choice by pressing the SET button.
Repeat this process for all the remaining digits.
You move on to selecting the time format.
Press the MODE button repeatedly until 12 for
the 12-hour format or 24 for the 24-hour format
appears in the LC display.
Confirm your choice by pressing the SET button.
You move on to setting the time.
A four-digit number appears in the LC display.
Enter the current time. Press the MODE button
repeatedly until the desired number appears
as the first digit.
Confirm your choice by pressing the SET button.
Repeat this process for all the remaining digits.
You move on to selecting the servicing interval.
Press the MODE button repeatedly until the
desired
number of units of distance to your next
in
tended bicycle service appears in the LC
display.
Note: You have the choice of 200, 400, 600
or 800 km or miles.
Confirm your choice by pressing the SET button.
You move on to selecting the unit of temperature.
Press the MODE button repeatedly until °C or
°F appears in the LC display.
Confirm your choice by pressing the SET button.
You have now completed the the basic settings.
Using the bike computer
Note: If the bike computer remains unused for
more than 5 minutes, it automatically switches
into the stand-by mode. Press any button to
Using functions
Note: All the functions and secondary functions
are described in the following list.
CLOCK: - Displays the time
Press the SET button
13
and keep it
pressed for
3 seconds to access the time settings.
TOTALODO: - Total odometer
Press the SET button and keep it pressed for
3seconds to access the wheel size settings
and total distance.
TOTAL-TM: Total time cycling
Press the SET button and keep it pressed for
3seconds to make changes to the saved total
time cycling.
TRIPDIST: Trip distance
Press the SET button and keep it pressed for
3seconds to reset the trip distance, the
average speed and the trip time displays to 0.
MAXSPEED: Highest speed
Press the SET button and keep it pressed for
3seconds to reset the maximum speed display
to 0.
AVGSPEED: Average speed
TRIPTIME: Trip time
TEMP: Thermometer
Press the SET button and keep it pressed to
switch between °C and °F.
Press the SET button to display the highest tem-
perature (HI) measured so far.
Press the SET button again to display the low-
est temperature (LO) measured so far.
Press and hold down the SET button while the
highest or lowest temperature is displayed to
switch back to the current temperature to
reset the saved data.
STPWATCH: Stopwatch
Press the SET button to start the stopwatch.
Press the SET button again to stop the stop-
watch.
Press the SET button and keep it pressed to
reset the stopwatch to 0.
CAL RATE: Current calorie consumption
CALORIE: Calorie meter
Press the SET button and keep it pressed to
reset the calorie counter to 0.
FAT-BURN: Fat burning in grams
Press the SET button and keep it pressed to
reset the fat burning value to 0.
KM: Odometer
Press the SET button and keep it pressed to
change the odometer settings.
The LC display
7
shows the symbol for count-
ing forwards or
backwards (+ or - respectively).
Press the MODE button
11
repeatedly until the
desired symbol is shown.
Confirm your choice by pressing the SET button.
You move on to setting the distance on the
odometer.
A 5-digit number appears in the LC display. En
ter
the desired distance. Press the MODE button
repeatedly until the desired number appears
as the first digit.
Confirm your choice by pressing the SET button.
Repeat this process for all the remaining digits.
TIME: Timer
Press the SET button and keep it pressed to
change the timer settings.
The LC display shows the symbol for counting
forwards or backwards (+ or - respectively).
Press the MODE button repeatedly until the
desired symbol is shown.
Confirm your choice by pressing the SET button.
You move on to the time settings of the timer.
A 5-digit number appears in the LC display.
Enter the desired time. Press the MODE button
repeatedly until the desired number appears
as the first digit.
Confirm your choice by pressing the SET button.
Repeat this process for all the remaining digits.
SCAN: Scan
Note: The scan mode automatically switches
between the trip distance, highest speed, average
speed and trip time displays.
Note: Refer to the section on “Basic settings” to
see how you make or change settings.
CUSTOMIZE mode
Apart from the ADVANCE and EASY mode, you
can make your individual adjustments in the
CUSTOMIZE mode (see procedure).
Press and hold the light button
12
to enter the
CUSTOMIZE mode.
Note: By repeatedly pressing the MODE
button
11
, you can toggle between the
ADVANCE and EASY modes.
In the EASY mode, press and hold the SET
button
13
. Press the MODE button to switch
the settings on or off (e.g. time). Choose „On“,
to add the chosen adjustment to the EASY
modes. Choose „Off“, if you do not want to
add the adjustments.
Press the SET button, to confirm your entry.
Using the backlight
Press the light button
12
to switch on the back-
light temporarily. The backlight automatically
extinguishes after a short period.
Resetting the bike computer
Press the MODE button
11
and SET button
13
at the same time and keep them pressed until
{{----}} appears in the LC display
7
.
Now press the MODE button and keep it
pressed. This resets all the settings.
Note: All stored data will be deleted.
Changing the battery
Note: The battery of the bike computer must be
replaced when the battery symbol
18
appears on
the LC display
7
.
Note: The battery of the sensor must be replaced
when the speed symbol
17
of the LC display can
no longer or hardly be seen when riding the bicycle.
Press the MODE key
11
and the SET key
13
at the same time and keep them pressed until
the {{-----}} symbol appears in the LC display
7
.
To replace the battery, proceed as shown in
figure A. Make sure you fit the battery the right
way round (polarity). This is shown inside the
battery compartment.
Press the SET key and keep it pressed to return
to normal operating mode.
Note: Once the batteries are removed, all stored
data will be erased after approx. 20 seconds.
Troubleshooting
Note: This device has delicate electronic compo-
nents. Therefore interference may occur when it is
near devices which transmit radio signals.
- If errors occur in the display, remove any such
devices from the vicinity of the product. In the case
of such malfunctions, remove the battery briefly and
then reinsert again.
Speed or distance are
not displayed.
Adjust magnet and
sensor correctly.
- Check that the battery
is inserted with the
poles arranged the
right way round.
Display is black The ambient temperature
is too high or the bicycle
computer was exposed
to direct sunlight for too
long. Remove appliance
from direct sunlight and
let it cool off for a while.
The LC-display shows
irregular symbols.
Remove battery and
replace it again.
Cleaning and care
Do not use any liquids or cleaning agents for
cleaning. Otherwise there is a risk of damaging
the device.
The device should only be cleaned on the out-
side with a soft dry cloth.
Disposal
The packaging is wholly composed of
environmentally friendly materials that
can
be disposed of at a local recycling centre.
Contact your local refuse disposal authority for more
details of how to dispose of your worn-out product.
In the interest of the environment, do not
throw out your product with your house-
hold refuse. Take it to a suitable centre
where it can be disposed of properly.
Your local council will be able to tell you
where the collection centres are located
and their opening times.
Defective or exhausted batteries mu
st be recycled
in accordance with Directive 2006 / 66 / EC
. Return
the batteries and / or the device through the appro-
priate collection facilities.
Improper disposal of batteries
can damage the environment!
Batteries must not be disposed of with the house-
hold refuse. They may contain toxic heavy metals
and require to be handled as special waste. The
chemical symbols of heavy metals are: Cd = cad-
mium, Hg = mercury, Pb = lead For this reason,
you must dispose of discarded batteries at a com-
munal disposal centre.
EMC
Kolesarski računalnik
Predvidena uporaba
Izdelek je predviden za uporabo kot kolesarski
računalnik. Ni za poslovno uporabo.
Funkcije
– jeziki menijev: GB, DE, FR, NL, IT, ES
– ura
– štoparica
– prikaz temperature °C / °F
– funkcija pomnilnika za min. in maks. temperaturo
– prikaz hitrosti vožnje (0–99,9 km / h)
– prikaz povprečne hitrosti (0–99,9 km / h)
– prikaz največje hitrosti (0–99,9 km / h)
– primerjava hitrosti
– prikaz pospeška in zmanjšanja hitrosti
– časovnik časa vožnje (maks. 9:59:59) (odštevanje
ali preštevanje)
– števec kilometrov (odštevanje ali preštevanje)
– prikazovalnik vseh kilometrov in celotne vožnje
– števec kalorij
– prikaz zgorevanja maščobe
– pregledni prikaz (vse funkcije se vklopijo in izklopijo)
– izklopna avtomatika funkcije ure
– osvetljava ozadja
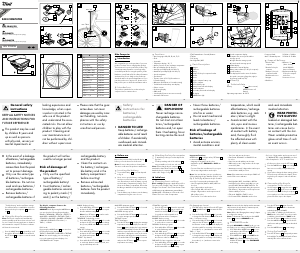
Opis delov
1a
Držalo
1b
Obloga za držalo
2a
Senzor
2b
Pokrov predalčka za baterije senzorja
3
Magnet
4
Kabelska vezica
5
Baterija 3 V , tip CR2032 gumb baterija
6a
Kolesarski računalnik
6b
Pokrov predalčka za baterije kolesarskega
računalnika
7
LC prikazovalnik
8
Prikaz funkcij
9
Prikaz druge vrednosti funkcije
10
Prikaz glavne vrednosti funkcije
11
Tipka MODE
12
Tipka za luč
13
Tipka SET
14
Prikaz funkcije SCAN
15
Prikaz intervala vzdrževanja
16
Prikaz primerjave hitrosti
17
Prikaz pospeška in zmanjšanja hitrosti:
Pospešek – obrati v nasprotni smeri urnega
kazalca
Zmanjšanje hitrosti – obrati v smeri urnega
kazalca
18
Prikaz stanja baterije
Tehnični podatki
Baterija: 3 V (CR2032 gumb baterija)
Vsebina dobave
1 kolesarski računalnik
1 držalo kolesarskega računalnika
1 magnet
1 senzor
4 kabelske vezice
2 bateriji 3 V
, tip CR2032 gumbna baterija
1 navodilo za uporabo
Splošni varnostni
napotki
VSE VARNOSTNE NAPOTKE IN NAVODILA
SHRANITE ZA PRIHODNJO UPORABO!
Otroci ali osebe, ki jim primanjkuje znanja ali
izkušenj v ravnanju z napravo, ali ki so ome-
jeni v svojih telesnih, zaznavnih ali duševnih
zmogljivostih, naprave ne smejo uporabljati
brez nadzora oziroma samo pod vodstvom
druge osebe, odgovorne za njihovo varnost.
Otroke je treba nadzorovati, da se ne igrajo z
izdelkom.
Prosimo, upoštevajte, da garancija ne pokriva
škode, ki bi nastala zaradi nestrokovnega rav-
nanja, neupoštevanja napotkov za uporabo in
varnost ali če bi napravo uporabljale osebe, ki
jim to ni dovoljeno.
Varnostni napotki za
uporabo baterij
SMRTNA NEVAR-
NOST! Otroci lahko baterije pogoltnejo, kar
je lahko smrtno nevarno. Če je kdo pogoltnil
Izogibajte se stiku s kožo, z očmi in s sluznicami.
Če pridete v stik s kislino iz baterij, prizadeto
mesto sperite z veliko vode in / ali poiščite
zdravniško pomoč!
Pred začetkom obratovanja
Pred prvo uporabo odstranite zaščitno folijo z
LC-zaslona
7
.
Vstavljanje baterij
Pri vstavljanju baterije
5
postopajte, kot je
predstavljeno na sliki A.
Namestitev kolesarskega
računalnika
Za namestitev naprave postopajte, kot je prika-
zano na slikah B do G.
Prva uporaba
Izvedba osnovnih nastavitev
Napotek: Po vstavitvi baterije
5
se LC-zaslon
7
po pribl. 2 sekundah samodejno vklopi. Prišli boste
neposredno na izbiro jezika.
Tolikokrat pritisnite tipko MODE
11
, da se
pojavi želeni jezik.
Svojo izbiro potrdite s pritiskom na tipko SET
13
.
Samodejno boste prešli na izbiro profila upo-
rabnika.
Tolikokrat pritisnite tipko MODE, da se pojavi
želeni profil uporabnika (ADVANCE (napre-
den) ali EASY (preprost)).
Svojo izbiro potrdite s pritiskom na tipko SET.
Sedaj preidete na izbiro velikosti pnevmatik
(SET WS).
Na LC-zaslonu se pojavi štirimestno število.
Vnesite obseg svojih pnevmatik v mm. V ta
namen tako pogosto pritisnite tipko MODE, da
se želena številka pojavi na prvem mestu.
Svojo izbiro potrdite s pritiskom na tipko SET.
Ta postopek ponovite za vsako od treh nasle-
dnjih številk.
Napotek: Obseg svojih pnevmatik lahko
ugotovite tako, da premer pnevmatik pomnožite
s 3,1416. Na naslednjem seznamu najdete
obsege najbolj običajnih kolesarskih pnevmatik.
Premer pnevmatik Obseg pnevmatik
20” 1598 mm
22” 1759 mm
24” 1916 mm
26” (650 A) 2073 mm
26,5” (Tubular) 2117 mm
26,6” (700x25C) 2124 mm
26,8” (700x28C) 2136 mm
27” (700x32C) 2155 mm
28” (700B) 2237 mm
ATB24”x1,75 1888 mm
ATB26 x1,4 1995 mm
ATB26 x1,5 2030 mm
ATB26 x1,75 2045 mm
ATB26x2 (650B) 2099 mm
27”x1 2138 mm
27”x1 1 / 4 2155 mm
Kot naslednje izberite svojo želeno enoto za
dolžino. V ta namen tolikokrat pritisnite tipko
MODE, da se na LC-zaslonu prikaže SET KM
ali SET MILE.
Svojo izbiro potrdite s pritiskom na tipko SET.
Sedaj preidete na vnos starosti.
Na LC-zaslonu se pojavi dvomestno število.
Vnesite svojo starost. V ta namen tako pogosto
pritisnite tipko MODE, da se želena številka
pojavi na prvem mestu.
Svojo izbiro potrdite s pritiskom na tipko SET.
Ta postopek ponovite za naslednjo številko.
Sedaj preidete na izbiro merske enote za težo.
Sedaj tako pogosto pritisnite tipko MODE, da
se na LC-zaslonu prikaže SET KG ali SET LB.
Svojo izbiro potrdite s pritiskom na tipko SET.
Sedaj preidete na vnos teže.
Na LC-zaslonu se pojavi trimestno število.
Vnesite svojo težo. V ta namen tako pogosto
pritisnite tipko MODE, da se želena številka
pojavi na prvem mestu.
Svojo izbiro potrdite s pritiskom na tipko SET.
Ta postopek ponovite za vse naslednje številke.
Sedaj preidete na izbiro časovnega sistema.
Sedaj tako pogosto pritisnite tipko MODE, da
se na LC-zaslonu prikaže 12 za 12-urni format
ali 24 za 24-urni format.
Svojo izbiro potrdite s pritiskom na tipko SET.
Sedaj preidete na nastavitev ure.
Na LC-zaslonu se pojavi štirimestno število.
Vnesite trenutni urni čas. V ta namen tako
pogosto pritisnite tipko MODE, da se želena
številka pojavi na prvem mestu.
Svojo izbiro potrdite s pritiskom na tipko SET.
Ta postopek ponovite za vse naslednje številke.
Sedaj preidete na izbiro intervala vzdrževanja.
Sedaj tako pogosto pritisnite tipko MODE, da
se prikaže vaše želeno število kilometrov, po
katerem želite svoje kolo naslednjič oddati za
vzdrževalna dela.
Napotek: Na izbiro imate 200, 400, 600
in 800 km oz. milj.
Svojo izbiro potrdite s pritiskom na tipko SET.
Sedaj preidete na izbiro temperaturne enote.
Sedaj tako pogosto pritisnite tipko MODE, da
se na LC-zaslonu prikaže °C ali °F.
Svojo izbiro potrdite s pritiskom na tipko SET.
Osnovne nastavitve so s tem zaključene.
Uporaba kolesarskega
računalnika
Napotek: Kadar kolesarskega računalnika
ne uporabljate za dlje kot 5 minute, se ta
samodejno preklopi v način pripravljenosti
(Stand-by). Pritisnite poljubno tipko, da raču-
nalnik ponovno aktivirate. Prikaz funkcij
8
vam prikazuje, v katerem načinu se ravnokar
nahajate.
Večkrat pritisnite tipko MODE
11
, da pobr-
skate po različnih načinih.
Pritisnite tipko SET
13
, da preidete v drugo
funkcijo vsake funkcije.
Pritisnite tipko SET in jo držite pritisnjeno, da
preverite ali ponastavite shranjene vrednosti.
Kolesarski računalnik ima
naslednje funkcije:
Funkcije za napredne:
CLOCK > TOTALODO > TOTAL-TM > TRIPDIST >
MAXSPEED > AVGSPEED > TRIPTIME > TEMP >
STPWATCH > CAL RATE > CALORIE > FAT-BURN
> KM+/- > TIME+/- > SCAN
Funkcije za začetnike:
TRIPDIST > AVGSPEED > TRIPTIME
Uporaba funkcij
Napotek: Na naslednjem seznamu so opisane
vse funkcije in podrejene funkcije.
CLOCK: ‒ prikaz urnega časa
Pritisnite tipko SET
13
in jo držite pritisnjeno
3sekunde, da preidete na nastavitev urnega
časa.
TOTALODO: ‒ število prevoženih kilometrov
Pritisnite tipko SET in jo držite pritisnjeno
3sekunde, da preidete na nastavitev velikosti
koles in števila vseh prevoženih kilometrov.
TOTAL-TM: celoten čas vožnje
Pritisnite tipko SET in jo držite pritisnjeno
3sekunde, da lahko izvedete spremembe
shranjenega celotnega časa vožnje.
TRIPDIST: število prevoženih kilometrov
Pritisnite tipko SET in jo držite pritisnjeno
3sekunde, da ponastavite prikaz števila prevo-
ženih kilometrov, povprečne hitrosti in časa
vožnje nazaj na 0.
MAXSPEED: najvišja hitrost
Pritisnite tipko SET in jo držite pritisnjeno
3sekunde, da prikaz najvišje hitrosti ponasta-
vite nazaj na 0.
AVGSPEED: povprečna hitrost
TRIPTIME: čas vožnje
TEMP: termometer
Pritisnite tipko SET in jo držite pritisnjeno, da
preidete s °C na °F ali obratno.
Pritisnite tipko SET za prikaz do sedaj izmer-
jene najvišje temperature (HI).
Ponovno pritisnite tipko SET, da prikažete do
sedaj izmerjeno najnižjo temperaturo (LO).
Pritisnite tipko SET in jo držite pritisnjeno, med-
tem ko se prikazuje najvišja oz. najnižja tem-
peratura, da ponastavite shranjene vrednosti.
C D
E
F
G
ca. 70 cm
Fig. C
Fig. D
Fig. E
B
A
H
6b
5
6a
4
32a1a
1b
5
2b
5
2a
6a
2a
3
1a 4
1b
2a
4
3
3
2a3
2a
8
7
14
9
10
11
12
13
15
16
17
18
Bike Computer
Proper use
The product is intended for use as a cycle computer.
Not for commercial use.
Functions
– Menu languages: GB, DE, FR, NL, IT, ES
– Clock
– Stopwatch
– Temperature °C / °F
– Memory function for min. and max. temperature
– Current speed (0–99.9 km / h)
– Mean speed (0–99.9 km / h)
– Highest speed (0–99.9 km / h)
– Speed comparison
– Acceleration and deceleration
– Trip timer (max. 9:59:59) (countdown or forwards)
BIKE COMPUTER
Operation and Safety Notes
K OLESARSKI RAČUNALNIK
Navodila za upravljanje in varnostna opozorila
CYKLOPOČÍTAČ
Pokyny pro obsluhu a bezpečnostní pokyny
Z31433
approx. 70 cm
87309_cri_Fahrradcomputer_SI-CZ.indd 1 04.02.13 09:49


Zapojte se do konverzace o tomto výrobku
Zde můžete sdílet, co si myslíte o Crivit IAN 87309 Cyklistický tachometr. Máte-li dotaz, nejprve si pozorně přečtěte návod. Žádost o příručku lze provést pomocí našeho kontaktního formuláře.