FR/BEFR/BE
FR/BEFR/BEFR/BEFR/BEFR/BEGB/IEGB/IEGB/IEGB/IE
GB/IE GB/IE GB/IE GB/IE GB/IE GB/IEGB/IEGB/IEGB/IE
GB/IEGB/IEGB/IEGB/IEGB/IE
Press the SET button
19
to confirm your entry. Press
the MODE button
13
to proceed to the next function
and repeat the steps as described above.
Press the MODE button
13
to exit settings.
Using the backlight
Press the SET button
19
to temporarily activate the
backlight. The backlight will switch off automatically
after a short amount of time.
Resetting the bicycle computer
Press and hold the SET button
19
first and hold the
MODE button
13
to proceed to setting mode. SET-
TING OPEN or SETTING RESET will be displayed.
Press the MODE button
13
until SETTING RESET
displayed, Confirm reset the product by press the
SET button
19
.
Now you can adjust the previously configured
basic settings (language, age, weight, time). Other
saved information will be deleted.
Replacing the battery
Note: The bicycle computer battery must be
replaced when the battery state indicator
17
is
shown on the LC display . Press and hold the MODE
button
13
first and hold the SET button
19
at the
same time and keep them pressed until the battery
symbol and {{----}} are shown on the LC display. To
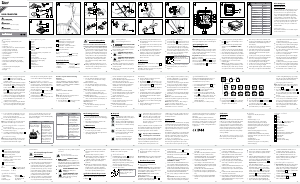
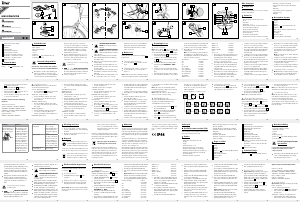
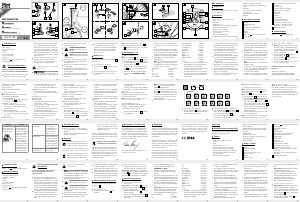
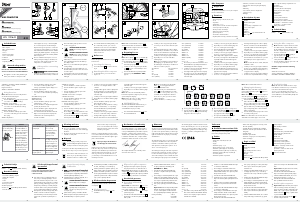
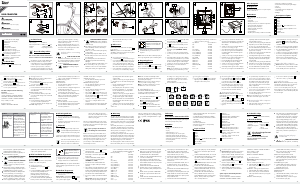
replace the battery, proceed as shown in figure A.
Open the battery compartment by turning the battery
cap anticlockwise towards to the icon using a co
in.
Remove the old battery and replace this with a new
battery. Please note the polarity when inserting the
battery. This is shown in the battery compartment.
Ensure that the O-ring is attached correctly before
inserting the battery. Turn the battery cap clockwise
towards to the icon onto the battery compartme
nt
using a coin to close it. Press and hold any button
to return to normal operating mode.
Note: When the battery has been removed, all i
nfor-
mation will be deleted after approx. 20 seconds.
Removing the bike
computer from the bike
Slide out the bike computer by pressing down
the bracket lock (See Fig. L).
Cut off the protruding tails of the cable ties
2
with a suitable tool such as diagonal pliers.
Troubleshooting
Note: This product has delicate electronic compo-
nents. Therefore interference may occur when it is
near products which transmit radio signals.
- If errors occur in the display, remove any such
products from the vicinity of the product. In the
case of such malfunctions, remove the battery briefly
and then reinsert again.
Problem Solution
Empty LC-display or no
response after putting
the batteries in again
Remove battery. Insert
a sharp object (e.g.
screwdriver) into the
hole marked with “RE-
SET”. Insert a 3 V bat-
tery into the battery
compartment in such a
way that the + terminal
points upwards. Replace
the battery cover on the
battery compartment.
The microprocessor is
reset and restarted.
Speed or distance are
not displayed.
Adjust magnet and
sensor correctly.
- Check that the battery
is inserted with the
poles arranged the
right way round.
Problem Solution
Display is black The ambient tempera-
ture is too high or the
bike computer was ex-
posed to direct sunlight
for too long. Remove
product from direct sun-
light and let it cool off
for a while.
The LC-display shows
irregular symbols.
Remove battery and
replace it again.
Cleaning and care
Do not use any liquids or cleaning agents for
cleaning. Otherwise there is a risk of damaging
the product.
The product should only be cleaned on the
outside with a soft, dry cloth.
Maintenance
Remove the battery when the product will not
be used for longer period of time.
Check regularly the cable and components for
any damage and safe fit.
Disposal
The packaging is made entirely of recyclable
materials, which you may dispose of at local
recycling facilities.
b
a
Observe the marking of the packaging
materials for waste separation, which
are marked with abbreviations (a) and
numbers (b) with following meaning:
1–7: plastics / 20–22: paper and
fibreboard / 80–98: composite
materials.
The product and packaging materials
are recyclable, dispose of it separately
for better waste treatment. The Triman
logo is valid in France only.
Contact your local refuse disposal
authority for more details of how to
dispose of your worn-out product.
To help protect the environment, please
dispose of the product properly when it
has reached the end of its useful life and
FUELSAVE: Fuel save comparison with a car.
Press and hold the SET button
19
for 3 seconds
and press the SET button
19
again to request the
fuel unit and fuel consumption setting.
ETA: Expected time arrival.
Press and hold the SET button
19
for 3 seconds
and press the SET button
19
again to request the
ETA distance count down. Press the MODE button
13
and press the SET button
19
again request the
ETA time and ETA countdown timer for selected.
KM +/-: Kilometer counter.
Press and hold the SET button
19
for 3 seconds
and press the SET button
19
again to request the
kilometer counter settings. The LC display will show
the symbol for increasing or decreasing the number
(+ or -) and distance counter value.
not in the household waste. Information
on collection points and their opening
hours can be obtained from your local
authority.
Faulty or used batteries / rechargeable batteries
must be recycled in accordance with Directive
2006/66/EC and its amendments. Please return
the batteries / rechargeable batteries and / or the
product to the available collection points.
Environmental damage through
incorrect disposal of the bat-
teries / rechargeable batteries!
Batteries / rechargeable batteries may not be dis-
posed of with the usual domestic waste. They may
contain toxic heavy metals and are subject to haz-
ardous waste treatment rules and regulations. The
chemical symbols for heavy metals are as follows:
TIME +/-: Timer.
Press and hold the SET button
19
for 3 seconds to
change the timer settings. The LC display will show
the symbol for increasing or decreasing the number
(+ or -) and timer counter value.
SCAN: Scan
Note: In scan mode, the display switches automat-
ically between the trip distance, maximum speed,
average speed and trip time.
Note: Refer to the „Basic settings“ chapter to
configure the settings.
Note: To deactivate scan mode press the Mode
button
13
to return to ADVANCE mode.
CUSTOMIZE mode
Alongside ADVANCE and EASY mode, you can
also apply your own settings in CUSTOMIZE mode.
There are two ways of requesting CUSTOMIZE
mode:
a) Press and hold the SET button
19
first and hold
the MODE button
13
to proceed to setting mode.
SETTING OPEN or SETTING RESET will be displayed.
Press the MODE button
13
until SETTING OPEN
displayed. Press the SET button
19
enter the setting
mode. Press the MODE button
13
will display
ADVANCE or EASY.
b) Press the SET button
19
enter to select ADVANCE
or EASY. By repeatedly pressing the MODE button
13
you can switch between the ADVANCE and
EASY modes. EASY mode, press and hold the
SET button
19
to request setting mode. Press the
SET button
19
again. Press the MODE button
13
to activate or deactivate individual settings
(i. e. CLOCK). Select „ON“ to add the selected
function to EASY mode. Select „OFF“ if you do
not wish to add the selected function to EASY
mode.
Cd = cadmium, Hg = mercury, Pb = lead. That is
why you should dispose of used batteries /
rechargeable batteries at a local collection point.
Warranty
The product has been manufactured to strict quality
guidelines and meticulously examined before deli-
very. In the event of product defects you have legal
rights against the retailer of this product. Your legal
rights are not limited in any way by our warranty
detailed below.
The warranty for this product is 3 years from the date
of purchase. Should this product show any fault in
materials or manufacture within 3 years from the
date of purchase, we will repair or replace it – at
our choice – free of charge to you.
The warranty period begins on the date of purchase.
Please keep the original sales receipt in a safe
location. This document is required as your proof
Lorsque les piles / piles rechargeables fuient,
évitez tout contact du produit chimique avec
la peau, les yeux ou les muqueuses! Rincez
les zones touchées à l‘eau claire et consultez
immédiatement un médecin !
PORTER DES GANTS DE
PROTECTION! Les piles / piles
rechargeables endommagées ou
sujettes à des fuites peuvent provoquer des
brûlures au contact de la peau. Vous devez
donc porter des gants adéquats pour les
manipuler.
En cas de fuite des piles / piles rechargeables,
retirez-les aussitôt du produit pour éviter tout
endommagement.
Utilisez uniquement des piles / piles rechar-
geables du même type. Ne mélangez pas des
piles / piles rechargeables usées et neuves !
of purchase. This warranty becomes void if the pro-
duct has been damaged, or used or maintained
improperly.
The warranty applies to defects in material or
manufacture. This warranty does not cover product
parts subject to normal wear, thus possibly conside-
red consumables (e.g. batteries) or for damage to
fragile parts, e.g. switches, rechargeable batteries
or glass parts.
Retirez les piles / piles rechargeables, si vous
ne comptez pas utiliser le produit pendant
une période prolongée.
Risque d‘endommagement du produit
Exclusivement utiliser le type de pile / pile
rechargeable spécifié.
Insérez les piles / piles rechargeables confor-
mément à l‘indication de polarité (+) et (-)
indiquée sur la pile / pile rechargeable et sur
le produit.
Nettoyez les contacts de la pile / pile rechar-
geable et du compartiment à pile avant
d‘insérer la pile !
Retirez immédiatement les piles / piles rechar-
geables usées du produit.
Compteur vélo
Introduction
Nous vous félicitons pour l‘achat de votre nouveau
produit. Vous avez opté pour un produit de grande
qualité. Le mode d‘emploi fait partie intégrante de ce
produit. Il contient des indications importantes pour
la sécurité, l’utilisation et la mise au rebut. Veuillez
lire consciencieusement toutes les indications d‘utili-
sation et de sécurité du produit. Ce produit doit uni-
quement être utilisé conformément aux instructions
et dans les domaines d‘application spécifiés. Lors
d‘une cession à tiers, veuillez également remettre
tous les documents.
Utilisation conforme
Le produit est conçu pour une utilisation en tant que
compteur de vélo. Non destiné à une utilisation
commerciale.
Avant la mise en service
Avant la première utilisation du produit, retirez le
film de protection de l‘écran LCD
12
.
Remarque : ce produit ne doit pas être utilisé sur
un vélo électrique. Le moteur du vélo pourrait occa-
sionner le dysfonctionnement du produit.
Mise en place de la pile
Pour insérer la pile
3
, veuillez procéder comme
le montre l‘illustration A.
Utilisez une pièce de monnaie pour ouvrir le
compartiment à pile. À l‘aide de la pièce, tour-
nez le couvercle du compartiment à pile dans
le sens anti-horaire. Veillez à ce que la pile soit
insérée correctement (respect de la polarité).
Celle-ci est indiquée à l‘arrière du produit.
Pour refermer le couvercle du compartiment à
pile, le tourner dans le sens horaire à l‘aide de
la pièce de monnaie.
Fixation du compteur de vélo
Pour installer le produit, procédez comme indi-
qué sur les illustration B à I.
Remarque : assurez-vous que le câble est
bien fixé. Il ne doit pas être happé par les
rayons du vélo, ou pendre à côté.
Mise en service
Modification des
réglages de base
Réglages de base : Langue > Profil de l‘utilisateur
> Taille des pneus > Unité de longueur > Âge >
Unité de poids > Poids > Format horaire > Heure >
Format date > Date > Économie en CO2 > Intervalle
d‘entretien > Lumière ON / OFF > Distance ETA >
Mode ETA > Format carburant > Consommation en
carburant > Unité de température
Fonctions
– Langues du menu : GB, DE, FR, NL, IT, ES
– Horloge
– Chronomètre
– Affichage de la température °C / °F
– Fonction mémoire pour température min. et max.
– Affichage de la vitesse (0–99,9 km / h)
– Affichage vitesse moyenne (0–99,9 km / h)
– Vitesse maximale (0–99,9 km / h)
– Comparaison de vitesse
– Tendance de vitesse
– Minuterie de parcours (max. 9:59:59) (compte
à rebours ou croissant)
– Compteur kilométrique (compte à rebours ou
croissant)
– Affichage du nombre de kilomètres total et du
temps de trajet total
– Compteur de calories
– Affichage de la combustion de graisse
– Économie en CO2
– Affichage Scan (les fonctions sont interconnectées)
– Fonction de démarrage automatique
– Distance ETA (heure d‘arrivée estimée)
– Heure d‘arrivée estimée
– Économie en carburant
– Phare arrière ON / OFF
Composants
1
Aimant
2
Attache-câble
3
Pile
4
Fixation
5
Capteur
6
Amortisseur pour fixation d‘ordinateur de vélo
7
Couvercle de la pile du compteur de vélo
8
Compteur de vélo
9
Affichage primaire de valeur de fonction
10
Affichage de fonction
11
Affichage secondaire de valeur de fonction
12
Écran LCD
Fonctions importantes
Touche MODE
13
pour configurer la valeur /
touche SET
19
, afin de modifier et appliquer les
réglages
- Langue : Sélection entre 6 langues
- Profil de l‘utilisateur : sélection entre AVANCE
(avancé) et FACILE (simple).
- Taille des pneus : indiquez la taille des pneus en
mm, saisie d‘un nombre à quatre chiffres.
Remarque : vous pouvez calculer la taille (U) des
pneus en multipliant le diamètre (D) par 3,1416
(ill. M). La liste (ill. N) contient la taille de pneu (U)
correspondant aux diamètres (D) courants.
- Unité de longueur : sélection entre KM / KMH ou
MILE / MPH.
- Âge : saisie d‘un nombre à deux chiffres.
- Unité de poids : sélection entre KG et LB.
13
Touche MODE (M)
14
Affichage de la comparaison de vitesse :
Compare la vitesse actuelle à la vitesse
moyenne
▲ supérieure à la vitesse moyenne
▼ inférieure à la vitesse moyenne
15
Écran SCAN
16
Affichage d‘intervalle d‘entretien
17
Affichage du niveau des piles
18
Tendance de vitesse
Indique l‘évolution du parcours, à savoir si la
vitesse augmente (barre plus grande à droite)
ou diminue (barre plus petite à gauche).
19
Touche SET (S)
Caractéristiques techniques
Pile : 3 V (courant continu)
(pile bouton CR2032)
Température de
fonctionnement : 0–50 °C
- Poids : saisie d‘un nombre à trois chiffres.
- Format horaire : sélection entre 12 et 24 heures.
- Heure : saisie de l‘heure et des minutes.
- Format de la date : sélection entre DD-MM-YY et
MM-DD-YY.
- Date : saisie de l‘année, du mois et du jour.
- Économie en CO2 : saisie d‘un nombre à trois
chiffres.
- Intervalle d‘entretien : saisie d‘un nombre à trois
chiffres.
Remarque : lorsque l‘intervalle d‘entretien est
sur „000“, l‘affichage de l‘entretien est établi.
- Lumière ON / OFF : allume (ON) ou éteint (OFF)
le rétroéclairage. Lorsque le rétroéclairage est
allumé, vous pouvez régler la durée d‘allumage
ou d‘arrêt du rétroéclairage.
- Distance ETA : saisie d‘un nombre à cinq chiffres.
Contenu de la livraison
1 compteur de vélo
1 support avec capteur
1 aimant
6attache-câbles
1 pile 3 V
(courant
continu), de type pile
bouton CR2032
1 mode d‘emploi
Instructions générales
de sécurité
CONSERVEZ TOUTES LES CONSIGNES DE
SÉCURITÉ ET INSTRUCTIONS EN VUE D‘UNE
CONSULTATION ULTÉRIEURE!
Le produit peut être utilisé par des enfants âgés
de 8 ans et plus ainsi que par des personnes
ayant des capacités physiques, sensorielles ou
mentales réduites ou manquant d‘expérience
ou de connaissances, s‘ils sont surveillés ou
s‘ils ont été informés de l‘utilisation sûre du
produit et comprennent les risques liés à son
- Mode ETA : sélection entre CLOCK (heure) et
TIME (temps de parcours)
- Format carburant : sélection entre LITER et GALLON
(gallon).
- Consommation de carburant : saisie d‘un nombre
à trois chiffres.
- Unité de température : sélection entre ° C et ° F.
Confirmez votre choix avec la touche SET
19
.
Appuyez sur la touche MODE
13
, afin de terminer
les réglages. Les réglages de base ont été effectués
avec succès.
Si vous souhaitez modifier les réglages de base,
suivez les étapes du chapitre „Réinitialisation du
compteur de vélo“ et effectuez de nouveau les
réglages de base.
utilisation. Les enfants ne doivent pas jouer
avec le produit. Le nettoyage et l‘entretien du
produit ne doivent pas être effectués par des
enfants laissés sans surveillance.
Veuillez noter que la garantie ne couvre pas
les dommages dus à une manipulation non
conforme, à la non-observation des consignes
de sécurité et du mode d‘emploi ou à l‘utilisa-
tion par des personnes non autorisées.
Consignes de sécurité
relatives aux piles /
aux piles rechargeables
DANGER DE MORT! Rangez les piles /
piles rechargeables hors de la portée des
enfants. En cas d’ingestion, consultez immédi-
atement un médecin !
RISQUE D‘EXPLOSION ! Ne
rechargez jamais des piles non
rechargeables. Ne court-circuitez
pas les piles / piles rechargeables et / ou ne
les ouvrez pas ! Autrement, vous risquez de
provoquer une surchauffe, un incendie ou une
explosion.
Ne jetez jamais des piles / piles rechargeables
au feu ou dans l’eau.
Ne pas soumettre les piles / piles rechargeables
à une charge mécanique.
Risque de fuite des piles / piles rechar-
geables
Évitez d’exposer les piles / piles rechargeables
à des conditions et températures extrêmes
susceptibles de les endommager, par ex. sur
des radiateurs / exposition directe aux rayons
du soleil.
GB/IEGB/IEGB/IEGB/IE
GB/IEGB/IEGB/IEGB/IE
GB/IEGB/IEGB/IEGB/IEDE/AT/CH
Initial use
Changing basic settings
Basic settings: Language > Application profile
>Tyre size > Unit of length > Age > Unit of weight
> Weight > Time format > Time > Date format >
Date > CO2 saved >Maintenance interval >Light
ON / OFF > ETA distance > ETA mode > Fuel format
> Fuel cons > Unit of temperature
Important functions
MODE button
13
to configure values / SET button
19
to edit and adopt settings
- Language: 6 language can be select.
- Application profile: ADVANCE or EASY can be
select.
- Tyre size: Enter the circumference for your tyres
sizs in mm, 4 digit number can be input.
To open the battery compartment cover, use a
coin to assist you to turn the battery compartment
cover in anti-clockwise direction. Make sure
you fit the battery the right way round (polarity).
This is shown on the back side of the product.
To close the battery compartment cover, use a
coin to assist you to turn the battery compart-
ment cover in clockwise direction.
Attaching the bike computer
To attach the product, proceed as shown in
Figs. B to I.
Note: Make sure the cable is attached prop-
erly. It must not get caught in the spokes or rail
along them.
Insert batteries / rechargeable batteries
according to polarity marks (+) and (-) on the
battery / rechargeable battery and the product.
Clean the contacts on the battery / rechargeable
battery and in the battery compartment before
inserting!
Remove exhausted batteries / rechargeable
batteries from the product immediately.
Before use
Remove the protective foil from the LC display
12
before first use.
Note: This product is not recommended to use
with E-bikes. Interference from the motor may affect
the performance of the product.
Inserting the battery
To insert the battery
3
, proceed as shown in Fig. A.
STPWATCH: Stopwatch.
Press the SET button
19
to start the stopwatch.
Press the SET button
19
again to stop the stopwatch.
Press and hold the SET button
19
for 3 seconds to
set the stopwatch to 0.
CAL RATE: Current calorie consumption.
CALORIE: Calorie counter.
Press and hold the SET button
19
for 3 seconds to
set the calorie counter to 0.
FAT-BURN: Fat-burning in grams.
Press and hold the SET button
19
for 3 seconds to
set the fat-burning value to 0.
CO2 KG: CO2 saved.
Press and hold the SET button
19
for 3 seconds
and press the SET button
19
again to request the
reference value for CO2 setting.
WEAR PROTECTIVE GLOVES!
Leaked or damaged batteries /
rechargeable batteries can cause
burns on contact with the skin. Wear suitable
protective gloves at all times if such an event
occurs.
In the event of a leakage of batteries /
rechargeable batteries, immediately remove
them from the product to prevent damage.
Only use the same type of batteries / recharge-
able batteries. Do not mix used and new
batteries / rechargeable batteries.
Remove batteries / rechargeable batteries if
the product will not be used for a longer period.
Risk of damage of the product
Only use the specified type of battery /
rechargeable battery!
MAXSPEED: Maximum speed.
Press and hold the SET button
19
for 3 seconds to
set the maximum speed to 0.
AVGSPEED: Average speed.
Press and hold the SET button
19
for 3 seconds to
set the average speed to 0.
TRIPTIME: Trip time.
TEMP: Thermometer.
Press the SET button
19
to display the maximum
temperature value reached (HI). Press the SET button
19
again to display the lowest temperature value
reached (LO). Press the SET button
19
and keep it
pressed while the highest or lowest temperature is
displayed to return to the current temperature and
delete the saved information. Press and hold the
SET button
19
for 3 seconds and press the SET
button
19
again to request temperature unit setting.
them. Overheating, fire or bursting can be the
result.
Never throw batteries / rechargeable batteries
into fire or water.
Do not exert mechanical loads to batteries /
rechargeable batteries.
Risk of leakage of batteries / rechargeable
batteries
Avoid extreme environmental conditions and
temperatures, which could affect batteries /
rechargeable batteries, e.g. radiators / direct
sunlight.
Avoid contact with the skin, eyes and mucous
membranes. In the event of contact with battery
acid, thoroughly flush the affected area with
plenty of clean water and seek immediate
medical attention.
- CLOCK: Displays the time.
Press and hold the SET button
19
for 3 seconds
and press the SET button
19
again to request the
time and date settings.
TOTALODO: Total mileage counter.
Press and hold the SET button
19
for 3 seconds
and press the SET button
19
again to change the
tyre size, ODO and maintenance interval settings.
TOTAL-TM: Total trip time.
Press and hold the SET button
19
for 3 seconds
and press the SET button
19
again to change the
saved total trip time.
TRIPDIST: Trip distance.
Press and hold the SET button
19
for 3 seconds to
reset the trip distance, maximum speed, average
speed and trip duration to 0.
maintenance shall not be made by children
without supervision.
Please note that the warranty does not cover
damage arising from improper treatment, non-
observance of the operating instructions and
safety advice or unauthorised use.
Safety instructions for
batteries / rechargeable
batteries
DANGER TO LIFE! Keep batteries / recharge-
able batteries out of reach of children. If acci-
dentally swallowed seek immediate medical
attention.
DANGER OF EXPLOSION!
Never recharge non-rechargeable
batteries. Do not short-circuit bat-
teries / rechargeable batteries and / or open
Included items
1 Bike computer
1 Bracket with sensor
1 Magnet
6 Cable ties
1 Battery 3 V
(Direct current), type
CR2032 button cell
1 Operating instructions
General safety advice
KEEP ALL THE SAFETY ADVICE AND INSTRUC-
TIONS IN A SAFE PLACE FOR FUTURE REFERENCE!
This product can be used by children aged from
8 years and above and persons with reduced
physical, sensory or mental capabilities or lack
of experience and knowledge if they have been
given supervision or instruction concerning use
of the product in a safe way and understand
the hazards involved. Children shall not play
with the product. Cleaning and user
- Light ON / OFF: Switch ON or OFF the back
light. If selected back light ON, you can input the
back light ON and OFF time.
- ETA distance: 5 digit number can be input.
- ETA mode: CLOCK or TIME for select,
- Fuel format: LITER or GALLON can be select.
- Fuel cons: 3 digit number can be input.
- Unit of temperature: °C or °F can be select.
Confirm your choice using the SET button
19
.Press
the MODE button
13
to exit settings. You have
now successfully configured the basic settings.
If you wish to change the basic settings, please
follow the steps outlined in the chapter „Resetting
the bicycle computer“ and reset all basic settings.
Using the bicycle computer
Note: The bicycle computer will automatically
switch to standby mode when it has not been used
for over 5 minutes. Pressing any button or vibrations
will reactivate the computer. The function indicator
will show the current mode
Press the MODE button
13
repeatedly to scroll
through the different functions(see the chapter on
“Using the functions“). Press and hold the SET
button
19
to request or reset the saved values.
The bicycle computer features the follow-
ing functions:
ADVANCE mode: By pressing the MODE button
13
you can select the following function displays:
CLOCK > TOTALODO > TOTAL-TM > TRIPDIST
>MAXSPEED > AVGSPEED > TRIPTIME > TEMP >
STPWATCH > CAL RATE > CALORIE > FAT-BURN
> CO2 KG >FUELSAVE > ETA > KM+/- > TIME+/-
> SCAN
14
Speed comparator display:
Compares the current speed with the average
speed
▲ higher than the average speed
▼ lower than the average speed
15
SCAN display
16
Maintenance interval display
17
Battery state indicator
18
Speed tendency:
This displays the trend in terms of whether the
speed is increasing (large bar, right) or
decreasing (small bar, left).
19
SET button (S)
Technical data
Battery: 3 V (Direct current)
(CR2032 button cell)
Operating temperature: 0–50 °C
Note: You can calculate your tyre circumference
(U) by multiplying the tyre diameter (D) by 3.1416
(Fig. M). The list (Fig. N) features the tyre circumfer-
ences (U) of conventional tyre diameters (D).
- Unit of length: KM / KMH or MILE / MPH can be
select.
- Age: 2 digit number can be input.
- Unit of weight: KG or LB can be select.
- Weight: 3 digit number can be input.
- Time format: 12 or 24hrs can be select.
- Time: hour and min can be input.
- Date format: DD-MM-YY or MM-DD-YY can be
select.
- Date: Year, month and day can be input.
- CO2 saved: 3 digit number can be input.
- Maintenance interval: 3 digit number can be input.
Note: If the maintenance interval input “000” will
switch off the service indicator.
– ETA (Estimated time of arrival)-Distance
– ETA time
– Fuel Saving
– Back light ON/ OFF
Parts Description
1
Magnet
2
Cable ties
3
Battery
4
Bracket
5
Sensor
6
Damper for bicycle computer bracket
7
Bicycle computer battery cap
8
Bicycle computer
9
Primary functional value display
10
Function indicator
11
Secondary functional value display
12
LC display
13
MODE button (M)
Functions
– Menu languages: GB, DE, FR, NL, IT, ES
– Clock
– Stopwatch
– Temperature display °C / °F
– Memory function for min. and max. temperature
– Bike speed display (0–99.9 km / h)
– Average speed display (0–99.9 km / h)
– Maximum speed display (0–99.9 km / h)
– Speed comparator
– Speed trend
– Trip timer (max. 9:59:59) (Countdown or for-
wardcounting)
– Odometer (Countdown or forward-counting)
– Total kilometer and total trip time display
– Calorie counter
– Fat burning display
– CO2 saved
– Scan display (functions are interconnected)
– Automatic start function
Bike Computer
Introduction
We congratulate you on the purchase of your new
product. You have chosen a high quality product.
The instructions for use are part of the product.
They contain important information concerning
safety, use and disposal. Before using the product,
please familiarise yourself with all of the safety
information and instructions for use. Only use the
product as described and for the specified applica-
tions. If you pass the product on to anyone else,
please ensure that you also pass on all the docu-
mentation with it.
Proper use
The product is intended for use as a bike computer.
Not for commercial use.
FR/BE FR/BEFR/BE FR/BEFR/BE FR/BE FR/BE


Zapojte se do konverzace o tomto výrobku
Zde můžete sdílet, co si myslíte o Crivit IAN 292844 Cyklistický tachometr. Máte-li dotaz, nejprve si pozorně přečtěte návod. Žádost o příručku lze provést pomocí našeho kontaktního formuláře.
odpověď | To bylo užitečné (0) (Přeloženo Googlem)