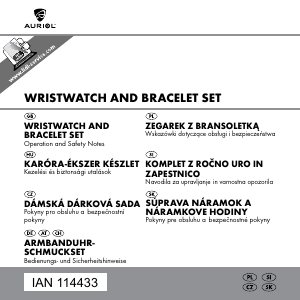
GB
PL
PL
PL
GB
PL
PL
GB
PL
PL
GB
PL
PL
Environmental damage through in-
correct disposal of the batteries!
Batteries may not be disposed of with the usual
domestic waste. They may contain toxic heavy
metals and are subject to hazardous waste
treatment rules and regulations. The chemical
symbols for heavy metals are as follows: Cd =
cadmium, Hg = mercury, Pb = lead. That is why
you should dispose of used batteries at a local
collection point.
Zegarek-Chronograf
§ Użycie zgodne z
przeznaczeniem
Chronograf pokazuje datę i godzinę i można go
używać jako stopera.
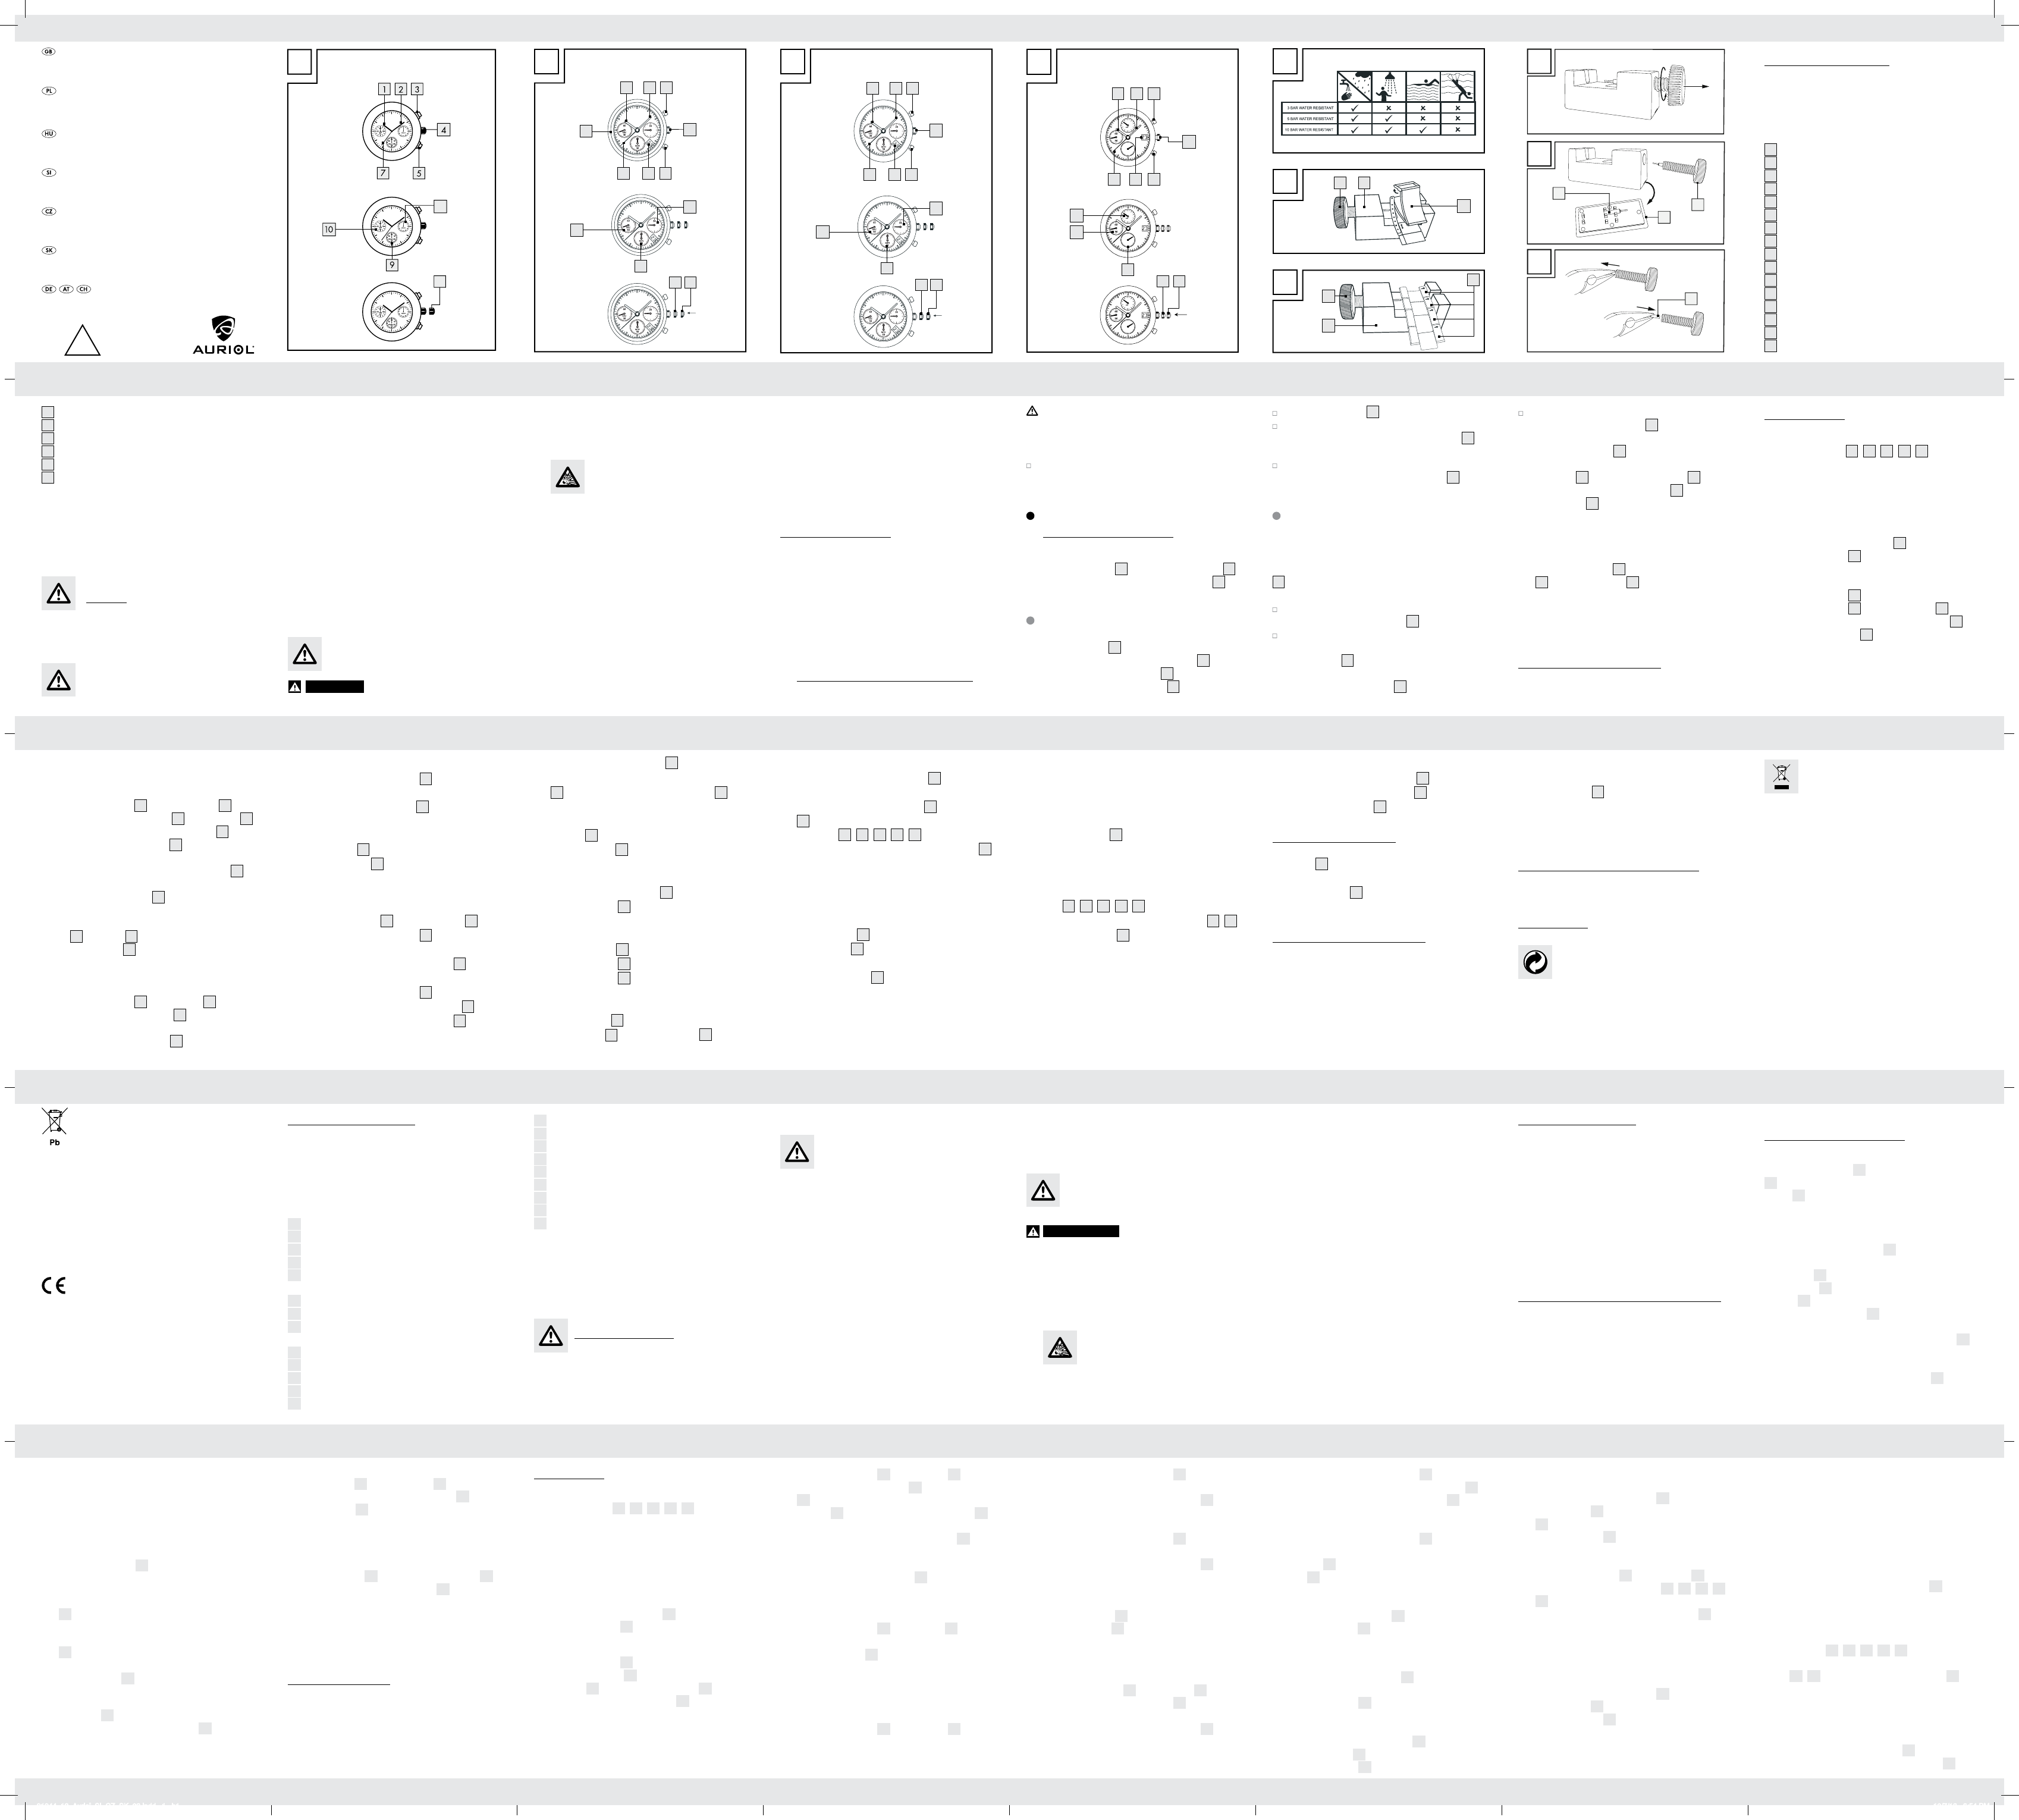
§ Opis części
a
Wskazówka godzinowa
s
Wskazówka minutowa
d
Przycisk start/stop (funkcja stopera)
f
Koronka
g
Przycisk (czas pośredni / zwolnienie czasu
pośredniego / resetowanie)
h
Wyświetlacz daty
j
Wskazówka sekundowa
k
Wyświetlacz 24 h (wskazuje czas na bazie
24 godz.)
l
Wyświetlacz sekundowy stopera
ö
Wyświetlacz minutowy stopera
ä
Wskazówka sekundowa stopera
*
Wyświetlacz stopera 1/20 sekundy
œ
Wyświetlacz minutowy / godzinowy stopera
Ogólna informacje
dotyczące bezpieczeństwa
Urządzenie to nie jest przeznaczone
do użytkowania przez dzieci lub osoby
o ograniczonej zdolności fizycznej,
czuciowej lub psychicznej, chyba że są one
nadzorowane przez osobę odpowiedzialną
za ich bezpieczeństwo lub otrzymały od niej
instrukcje o sposobie użytkowania urządzenia.
Należy nadzorować dzieci, aby nie bawiły się
urządzeniem.
Nie używaj urządzenia gdy jest uszkodzone.
Uszkodzone urządzenia zagrażają życiu!
Pamiętaj, że gwarancja nie obejmuje
uszkodzeń spowodowanych nieprawidłową
obsługą, nieprzestrzeganiem niniejszej
instrukcji ani ingerencji w urządzenie przez
osoby nieupoważnione.
8 Wyciągnij koronkę
4
do pozycji 2
¨
.
8 Wciśnij przycisk start/stop
3
lub przycisk
5
, aby zresetować wskazówkę sekundową
stopera
9
i wskazówki minutowe stopera
0
do pozycji “60”.
8 Gdy naciskany jest przycisk start/stop
3
, ws-
kazówki obracają się w kierunku przeciwnym
do ruchu wskazówek zegara.
8 Gdy naciskany jest przycisk
5
, wskazówki
obracają się w kierunku zgodnym z ruchem
wskazówek zegara.
Wskazówka: Wskazówki poruszają się szybko,
jeśli przycisk start/stop
3
lub przycisk
5
są
przytrzymane.
8 Wciśnij koronkę
4
z powrotem do pozycji
wyjściowej.
Z31633B, Z31633D - Gdy żadna ze wska-
zówek stopera nie znajduje się w pozycji
“60”:
8 Wyciągnij koronkę
4
do pozycji 2
¨
.
§ Obsługa
Wskazówka: Przed ustawieniem godziny,
wskazówki stopera
9
,
0
,
ä
,
*
,
œ
należy
zresetować na pozycję „60” (godzinę 12).
§ Resetowanie wskazówek
stopera do pozycji “60”
(godziny 12)
Stoper wciąż odmierza czas:
8 Wciśnij przycisk start/stop
d
.
8 Wciśnij przycisk
g
.
Stoper nie odmierza czasu:
8 Wciśnij przycisk
g
(Z31633A,C).
8 Naciśnij przycisk
g
lub ostrożnie wyciągnij
koronkę
4
z koperty do pozycji 2
¨
lub
wielokrotnie naciskaj przycisk
g
(Z31633B,
D, E, F).
Z31633A, Z31633C - Gdy któraś ze
wskazówek stopera nie znajduje się w
pozycji “60”:
8 Wskazówka: Aby usunąć jeden lub więcej
segmentów
x
na mocowaniu
y
, wyciśnij
pręt sprężysty przy pomocy suwaka
v
, wyjmij
mocowanie
y
i postępuj w sposób opisany
powyżej.
§ Jak wymienić szpilkę w
suwaku
8 Wyjmij suwak
v
, otwórz dolną pokrywę
n
zawierającą zapasową szpilkę
b
.
8 Starą szpilkę należy ostrożnie wyjąć z suwaka
przy pomocy szczypiec.
8 Przy pomocy szczypiec ostrożnie włóż
zapasową szpilkę do suwaka. Nowa szpilka
jest zamontowana.
§ Uruchomienie
§ Wymiana baterii
Wskazówka: Wymiany baterii dokonuj w specja-
listycznym sklepie.
§ Wyjmowanie segmentów
(Rys. G)
Wskazówka: Segmenty, które można wyjąć, są
oznaczone strzałką (patrz Rys. G). Są połączone
ze sobą za pomocą szpilek. Można je wypchnąć
w kierunku wskazanym przez strzałkę przy pomocy
zestawu naprawczego
c
. Jeśli to konieczne użyj
pincety do wyjęcia szpilek.
8 Umieść chronograf w zestawie naprawczym
c
tarczą zegara w dół.
8 Usuń szpilki z segmentów, które chcesz wyjąć
(w sposób opisany powyżej), i wyjmij segment
x
.
Wskazówka: Jeśli chcesz wyjąć więcej niż
jeden segment
x
z rzędu, wystarczy wyjąć
dwie zewnętrzne szpilki.
8 Połącz ponownie pasek zegara łącząc luźne
segmenty
x
przy pomocy szpilki. Wciśnij
szpilkę do sąsiednich segmentów
x
w kierun-
ku przeciwnym do wskazania strzałki.
Pod żadnym pozorem nie rozkładaj
urządzenia na części. Naprawy powinny
być dokonywane wyłącznie przez osoby
wykwalifikowane.
Instrukcje bezpieczeństwa
dotyczące baterii
#
OSTRZEŻENIE! ŚMIERTELNE
NIEBEZPIECZEŃSTWO! Baterie mogą
zostać połknięte, co może być niebezpieczne
dla życia. Jeśli bateria zostanie połknięta,
należy niezwłocznie skontaktować się z
lekarzem.
Wyjmij baterie z urządzenia gdy nie będzie
ono używane przez dłuższy czas.
UWAGA! RYZYKO EKSPLOZJI!
Nigdy nie wolno ładować baterii!
Wkładając baterie zwróć uwagę na
odpowiednią biegunowość!
8 Przytrzymaj przycisk start/stop
3
przez ok.
2 sekundy. Wskazówka minutowa stopera
wykona pełen obrót. Wciśnij przycisk
5
,
aby ustawić wskazówkę minutową stopera na
pozycję “60”.
8 Przytrzymaj przycisk start/stop
3
przez ok.
2 sekundy. Wskazówka sekundowa stopera
wykona pełen obrót. Wciśnij przycisk
5
, aby
ustawić wskazówkę sekundową stopera na
pozycję “60”.
Wskazówka: Wskazówki stopera poruszają się
szybko, jeśli przycisk
5
jest przytrzymany.
8 Wciśnij koronkę
4
z powrotem do obudowy.
Z31633E, Z31633F - Gdy żadna ze wska-
zówek stopera nie znajduje się w pozycji
“60”:
8 Wyciągnij koronkę
f
do pozycji 2
¨
.
8 Przytrzymaj przycisk start/stop
d
przez ok. 2
sekundy. Wskazówka stopera 1/20 sekundy
wykona pełen obrót. Wciśnij przycisk
g
, aby
ustawić wskazówkę stopera 1/20 sekundy na
pozycję “10”.
Jeśli to konieczne, wyczyść baterie i styki
przed włożeniem baterii.
Zużyte baterie natychmiast wyjmij z
urządzenia. Istnieje zwiększone ryzyko
wycieku!
Jeśli powyższe instrukcje nie są przestrzegane,
wówczas baterie mogą się całkowicie
rozładować. W takim przypadku istnieje
ryzyko wycieku. Jeśli baterie wyciekły w
środku urządzenia, należy je natychmiast
wyjąć, aby uniknąć uszkodzeń!
Nie wolno utylizować baterii z odpadkami
domowymi!
Każdy konsument jest prawnie zobowiązany
do utylizacji baterii w odpowiedni sposób!
Trzymaj baterie z dala od dzieci; nie wrzucaj
ich do ognia, nie stykaj ich ani nie rozkładaj
na części.
Unikaj kontaktu ze skórą, oczami i błoną
śluzową. Jeśli jakiekolwiek części ciała wejdą
w kontakt z kwasem z baterii, należy przemyć
je dużą ilością wody i / lub jeśli to konieczne
skontaktować się z lekarzem!
8 Przytrzymaj przycisk start/stop
d
przez ok. 2
sekundy. Wskazówka sekundowa stopera
ä
wykona pełen obrót. Wciśnij przycisk
g
, aby
ustawić wskazówkę sekundową stopera na
pozycję “12”.
8 Przytrzymaj przycisk start/stop
d
przez ok. 2
sekundy. Wskazówka minutowa / godzinowa
stopera
œ
wykona pełen obrót. Wciśnij przy-
cisk
g
, aby ustawić wskazówkę minutową /
godzinową stopera na pozycję “12”.
Wskazówka: Wskazówki stopera poruszają
się szybko, jeśli przycisk
g
jest przytrzymany.
8 Wciśnij koronkę
f
z powrotem do pozycji
wyjściowej.
Stoper wskazuje czas pośredni:
8 Wciśnij przycisk start/stop
d
, aby rozpocząć
odmierzanie czasu.
8 Wciśnij przycisk
g
, aby odczytać czas
pośredni. Pomiaru i zwolnienia czasu
pośredniego można dokonywać tyle razy, ile
potrzeba naciskając przycisk
g
.
8 Wciśnij przycisk
d
, aby zatrzymać pomiar czasu.
8 Wciśnij przycisk
g
, aby wyzerować.
§ Wodoszczelność
Ten zegarek jest wodoszczelny do 10 bar
zgodnie z normą DIN 8310. Rysunek E pokazuje
dopuszczalne obszary wykorzystania. Należy
pamiętać, że wodoszczelność nie jest stałą
cechą. Powinna ona być sprawdzana co roku, a
szczególnie przed poddaniem jej wyjątkowym
warunkom, ponieważ funkcjonalność
wbudowanych elementów uszczelniających
maleje w trakcie codziennego używania.
§ Regulacja paska zegarka
(Z31633C, Z31633D, Z31633E)
Wskazówka: Do wykonania tego kroku potrzeb-
na będzie dziurkownica.
m OSTROŻNIE – RYZYKO ZGNIECENIA!
Uważaj, aby nie włożyć palców lub innych
części ciała do dziurkownicy.
8 Aby wyregulować długość paska, wyciśnij
nowy otwór w odpowiednim miejscu na pasku
przy pomocy dziurkownicy.
§ Ustawianie godziny
8 Ostrożnie wyciągnij koronkę
f
z obudowy
do pozycji 2
¨
, jeśli wskazówka sekundowa
7
znajduje się w pozycji “60” (godziny 12).
8 Kręcąc koronką
f
w kierunku zgodnym z
ruchem wskazówek zegara ustaw na chrono-
grafie żądane godziny i minuty. Nie naciskaj
przycisku start/stop
d
ani przycisku
g
,
ponieważ wskazówki stopera
9
,
0
,
ä
,
*
,
œ
zaczną się poruszać.
8 Po ustawieniu godziny, wciśnij koronkę
f
z
powrotem do obudowy. Zegarek uruchomi się
z ustawioną godziną.
§ Ustawianie daty
(Z31633B /Z31633D-F)
8 Ostrożnie wyciągnij koronkę
f
z obudowy
do pozycji 1
å
.
8 Kręcąc koronką
f
w kierunku zgodnym z
ruchem wskazówek zegara ustaw na chrono-
grafie żądaną datę.
§ Skracanie paska zegarka
(Z31633A/Z31633F)
Wskazówka: Pasek zegarka można skrócić
regulując mocowanie
y
lub wyjmując segmenty
x
. W tym celu użyj dołączonego zestawu napraw-
czego
c
.
§ Regulowanie mocowania
(Rys. F)
Wskazówka: Mocowanie
y
jest przytrzymywa-
ne w miejscu przez pręt sprężysty. Aby wyregulować
mocowanie
y
, umieść chronograf w zestawie
naprawczym
c
i ściśnij pręt sprężysty przy pomocy
suwaka
v
.
8 Otwórz mocowanie
y
.
8 Ściśnij i przytrzymaj pręt sprężysty (w sposób
opisany powyżej) i wyreguluj mocowanie
y
zgodnie z zapotrzebowaniem.
8 Odblokuj pręt sprężysty, aby mógł powrócić
do pozycji wyjściowej. Mocowanie
y
jest
przytrzymane w miejscu.
Wskazówka:
– Datę można ustawić wyłącznie kręcąc w kierun-
ku zgodnym z ruchem wskazówek zegara.
– Nie należy ustawiać daty pomiędzy godz. 21
a godz. 1 w nocy, ponieważ zachodzi ryzyko,
że nie przestawi się ona prawidłowo. Jeśli jed-
nak trzeba ustawić datę w tym czasie, zmień
najpierw godzinę na inny okres czasu. Po usta-
wieniu daty, zmień godzinę na prawidłową.
8 Po ustawieniu daty, wciśnij koronkę
f
z pow-
rotem do obudowy
§ Używanie stopera
Odmierzany czas jest wskazywany przez wska-
zówki stopera
9
,
0
,
ä
,
*
,
œ
. Poruszają się
one niezależnie od wskazówek godzinowej i minu-
towej
a
,
s
, oraz wskazówki sekundowej
7
.
Maksymalny okres czasu wyświetlany przez
stoper to jedna godzina (Z31633A-D).
Maksymalny okres czasu wyświetlany przez stoper
to 12 godzin (Z31633E-F).
Start: naciśnij przycisk start/stop
d
.
Stop: ponownie naciśnij przycisk start/stop
d
.
å
Pozycja 1
¨
Pozycja 2
ˆ
Obrotowa luneta
y
Mocowanie
x
Segment
c
Zestaw naprawczy
v
Suwak
b
Zapasowa szpilka
n
Dolna pokrywa
§ Zakres dostawy
1 Zegarek-Chronograf
1 zestaw naprawczy (Z31633A / Z31633F)
1 bateria pastylkowa
1 instrukcja obsługi
Bezpieczeństwo
ZACHOWAJ WSZYSTKIE WSKAZÓWKI
DOTYCZĄCE BEZPIECZEŃSTWA W BEZPIECZ-
NYM MIEJSCU DO WGLĄDU W PRZYSZŁOŚCI!
GB
PL
PL
GB
PL
PL
GB
PL
PL
GBGB
GB GB GB GB GB GB GB GB
GB
Z31633A, Z31633C - If either of the
stopwatch hands are not at the “60”
position:
8 Pull out the crown
4
to the position 2
15
.
8 Press the Start / stop button
3
or the button
5
to reset the stopwatch second display
9
and
stopwatch minutes display
10
hands to “60”
position.
8 By pressing the Start / stop button button
3
,
the hands move counter clockwise.
8 By pressing the button
5
, the hands move
clockwise.
Note: The hands move quickly if the start / stop
button
3
or button
5
are keRO pressed.
8 Push the crown
4
back into the housing.
Z31633B, Z31633D - If none of the stop
watch hands is in the “0” position:
8 Pull out the crown
4
to position 2
15
.
8 Press the start / stop button
3
for about 2
seconds. The stopwatch minute hand makes a
full revolution. Press button
5
to set the stop
watch minute hand to “60”.
Q
Operation
Note: Before you can adjust the time or date, the
stopwatch displays
9
,
10
,
11
,
12
,
13
have to be
reset to “60” (12 o’clock).
Q
Resetting the Stopwatch
Displays to “60” (12 o’clock)
The stopwatch is still running:
8 Press the start / stop button
3
.
8 Press the button
5
(Z31633A,C).
The stopwatch is not running:
8 Press the button
5
(Z31633A,C).
8 Press the button
5
or pull the crown
4
carefully out of the housing to position 2
15
or press the button
5
repeatedly
(Z31633B,D,E,F).
Connect the watch strap together again by
joining the loose segments
18
with a pin. Press
this pin against the direction of the arrow into the
adjacent segments
18
.
Note: In order to remove one or more
segments
18
directly on the fastener
17
, press
out the spring bar with the slider
20
, remove
the fastener
17
and proceed as described
above.
Q
How to exchange the pin inside
the slider
8 Take out the slider
20
, open the bottom cover
22
with the spare pin
21
inside.
8 You will need the pliers to carefully remove the
old pin from the slider.
8 Insert the spare pin carefully into the slider by
again using the pliers. The new pin is installed.
Q
Preparations for use
Q
Changing the battery
Note: Have batteries changed in a specialist shop.
Open the fastener
17
.
Keep the spring bar squeezed together (as
described above) and adjust the fastener
17
as desired.
Release the spring bar so that it can snap back
into the original position. The fastener
17
is
now fixed in place.
Removing Segments (Fig. G)
Note: The segments which can be removed are
marked with an arrow (see Fig. G). They are
connected together with pins. These can be pushed
out in the direction of the arrow with the repair set
19
. Use a pair of tweezers if necessary in order to
remove the pins.
Place the chronograph with the dial facing
downwards in the repair set
19
.
Remove the pins of the segment that you wish
to remove (as described above) and take out
the segment
18
.
Note: If you would like to take out more than
one consecutive segment
18
, it is sufficient to
remove the two outer pins.
CAUTION - DANGER OF CRUSHING!
Please ensure that you do not put your fingers
or other parts of the body between the hole
punch.
In order to be able to adjust the size of the
watch strap, punch a new hole at the required
position in the watch strap with the hole punch.
Shortening the watch strap
(Z31633A / Z31633F)
Note: The watch strap can be shortened by
adjusting the fastener
17
or removing segments
18
.
To this purpose you should use the repair set
19
supplied.
Adjusting the Fastener (Fig. F)
Note: The fastener
17
is held in position by a
spring bar. In order to adjust the fastener
17
, place
the chronograph in the repair set
19
and press the
spring bar together with the slider
20
.
Keep batteries away from children; do not
throw them in the fire, short-circuit them or take
them apart.
Avoid contact with the skin, eyes and mucous
membranes. Any parts of the body coming into
contact with battery acid should be rinsed off
with copious amounts of water and / or a doctor
contacted if necessary!
Q
Watertightness
This watch is watertight to 10 bar in accordance
with DIN 8310. Figure E shows the permissible
areas of use. Please note that the watertightness
is not a permanent feature. It should be checked
annually and particularly before subjecting it to
special conditions, as the function of the inbuilt
sealing elements diminishes with daily use.
Q
Adjusting the watch strap
(Z31633C, Z31633D, Z31633E)
Note: For this step you need a hole punch.
danger to life. If a battery has been swallowed,
medical help is required immediately.
Remove the battery from the device if it is not
going to be used for a prolonged period.
CAUTION! DANGER OF
EXPLOSION! The batteries must
never be recharged!
When inserting the battery, ensure the correct
polarity!
If necessary, clean the battery and device
contacts before inserting the battery.
Remove a spent battery immediately from the
device. There is an increased danger of leaks!
If the above instructions are not complied with,
the battery may discharge itself beyond its end
voltage. There is then a danger of leaking. If
the battery has leaked inside your device, you
should remove it immediately in order to prevent
damage to the device!
Batteries must not be disposed of in the normal
domestic waste!
Every consumer is legally obliged to dispose of
batteries in the proper manner!
Children or persons who lack the knowledge
or experience to use the device or whose
physical, sensory or intellectual capacities are
limited must never be allowed to use the device
without supervision or instruction by a person
responsible for their safety. Children must never
be allowed to play with the device.
Do not use the device if it is damaged. Damaged
devices represent a danger of death!
Please note that the guarantee does not cover
damage caused by incorrect handling, non-
compliance with the operating instructions or
interference with the device by unauthorised
individuals.
Under no circumstances should you take the
device apart. Repairs should only be carried
out by specialist personnel.
Safety Instructions for
Batteries
WARNING!
DANGER TO LIFE! Batteries
can be swallowed, which may represent a
17
Fastener
18
Segment
19
Repair set
20
Slider
21
Spare pin
22
Bottom cover
Q
Scope of delivery
1 chronograph watch
1 tooling kit (Z31633A / Z31633F)
1 button cell
1 directions for use
Safety
Keep all the safety advice and
instructions in a safe place for future
reference!
General Safety
Information
Chronograph Watch
Q
Proper Use
The chronograph shows the date and time and can
be used as a stopwatch.
Q
Description of Parts
1
Hour hand
2
Minute hand
3
Start/stop button (stopwatch function)
4
Crown
5
Button (for split time / split time release / reset)
6
Date display
7
Second hand
8
24 h display (shows the time on a 24-hour basis)
9
Stopwatch seconds display
10
Stopwatch minutes display
11
Stopwatch second hand
12
Stopwatch 1/20 second display
13
Stopwatch minute / hour display
14
Position 1
15
Position 2
16
Bezel
A
15
8
Z31633A / Z31633C
I
H
J
20
21
21
22
Z31633A /
Z31633F
Z31633A /
Z31633F
Z31633A /
Z31633F
8 Press the start / stop button
3
for about 2
seconds. The stopwatch second hand makes a
full revolution. Press button
5
to set the stop
watch second hand to “60”.
Note: The stop watch hands move quickly if
you keep button
5
pressed.
8 Press the crown
4
back into the housing.
Z31633E, Z31633F - If none of the stop
watch hands is in the “60” position:
8 Pull out the crown
4
to the position 2
15
.
8 Press the start / stop button
3
for about 2
seconds. The stopwatch 1 / 20 second hand
makes a full revolution. Press button
5
to set
the stop watch 1 / 20 second hand to “10”.
8 Press the start / stop button
3
for about 2
seconds. The stopwatch second hand
11
makes a full revolution. Press button
5
to set
the stop watch second hand to “12”.
8 Press the start / stop button
3
for about 2
seconds. The stopwatch minute / hour hand
13
makes a full revolution. Press button
5
to
set the stop watch minute / hour hand to “12”.
Note: The stop watch hands move quickly if you
keep button
5
pressed.
8 Push the crown
4
back to the normal position.
The stopwatch shows the split time:
8 Press the start/stop button
3
to start counting.
8 Press the button
5
for split time measurement.
Measurement and release of the split time can
be repeated as many time as necessary by
pressing button
5
.
8 Press the button
3
to stop counting.
8 Press the button
5
to reset.
Q
Adjusting the Time
8 Pull the crown
4
carefully out of the housing
to position 2
15
if the second hand
7
is in the
“60” (12 o’clock) position.
8 Adjust the chronograph to the desired minutes
and hours by turning the crown
4
in a
clockwise direction. Please ensure that you do
not press the start /stop button
3
or the button
5
. Otherwise the hands of the stopwatches
will move
9
,
10
,
11
,
12
,
13
.
8 After you have set the time, press the crown
4
back into the housing. The watch now starts
with the desired time.
Q
Setting the Date (Z31633B /
Z31633D-F)
8 Pull the crown
4
carefully out of the housing
to position 1
14
.
8 Adjust the chronograph to the desired date by
turning the crown
4
in a clockwise direction.
Note:
– The date can only be set by turning in a
clockwise direction.
– The date should not be adjusted between 9
p.m. and 1 a.m., as it is possible that it will not
turn over correctly. If the date has to be
adjusted during this period, change the time
beforehand to a different period. You should
only correct the time after adjusting the date.
8 Press the crown
4
back into the housing after
adjusting the date.
Q
Using the Stopwatch
The time measured is shown by the stopwatch
displays
9
,
10
,
11
,
12
,
13
. These move
independently of the hour and minute hand
1
,
2
and the second hand
7
.
The stopwatch can display a maximum period of
one hour (Z31633A-D).
The stopwatch can display a maximum period of
12 hours (Z31633E-F).
Start: press the start / stop button
3
.
Stop: press the start / stop button
3
again.
Reset: press the button
5
.
Q
Timing (Z31633B)
The bezel
16
is used to indicate a period of time
(e.g. jogging time).
8 Turn the bezel
16
in anti-clockwise direction to
mark the start of timing.
Q
Tachymeter (Z31633E)
The tachymeter shows in km / h how fast an object
(e.g. a car or human being) is moving. In order to
be able to read off the result directly, the distance
covered must be 1 km long.
8 Start the stopwatch when the object or
individual crosses the starting point. Stop the
stopwatch when the finishing point is reached.
8 Read off the number of seconds that have
elapsed (e.g. 50 seconds) on the stopwatch
second hand
11
.
8 Then read off the value which is to be found on
the tachymeter (e.g. 72). This value shows the
speed of movement (e.g. 72 = 72 km / h).
Q
Cleaning and maintenance
8 Clean the product on the outside only with a
soft, dry cloth.
Q
Disposal
The packaging is made entirely of
recyclable materials, which you may
dispose of at local recycling facilities.
Contact your local refuse disposal authority for
more details of how to dispose of your worn-out
product.
To help protect the environment, please
dispose of the product properly when it
has reached the end of its useful life and
not in the household waste. Information
on collection points and their opening
hours can be obtained from your local
authority.
Faulty or used batteries must be recycled in
accordance with Directive 2006 / 66 / EC. Please
return the batteries and / or the device to the
available collection points.
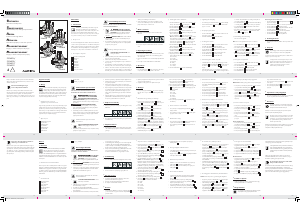
1545
24H
04
08
20
16
12
40
1050
20
1545
24H
04
08
20
16
12
40
1050
20
1545
24H
04
08
20
16
12
40
1050
20
B
7
21
3
16
14 15
4
8
5
6
10
11
Z31633B
1545
24H
04
08
20
16
12
40
1050
20
1545
24H
04
08
20
16
12
40
1050
20
1545
24H
04
08
20
16
12
40
1050
20
C
7
21
3
14 15
4
8
5
6
10
11
Z31633D
12
6
8
210
4
10
5
4
1
3
7
28
6
9
45
15
SEC
SEC
12
6
8
210
4
10
5
4
1
3
7
28
6
9
45
15
SEC
SEC
12
6
8
210
4
10
5
4
1
3
7
28
6
9
45
15
SEC
SEC
D
1
56
11
2 3
4
12
7
13
14 15
Z31633E / Z31633F
E
F
17
1920
G
18
19
20
Z31633A /
Z31633F
Z31633A /
Z31633F
Z31633A, Z31633B
Z31633C, Z31633D
Z31633E, Z31633F
CHRONOGRAPH
Bedienungs- und Sicherheitshinweise
CHRONOGRAPH WATCH
Operation and Safety Notes
KARÓRA
Kezelési és biztonsági utalások
KRONOGRAF
Navodila za upravljanje in varnostna opozorila
CHRONOGRAF
Pokyny pro obsluhu a bezpečnostní pokyny
CHRONOGRAF
Pokyny pre obsluhu a bezpečnostné pokyny
ZEGAREK-CHRONOGRAF
Wskazówki dotyczące obsługi i bezpieczeństwa
4
91944_13_Auriol_SI_CZ_SK_03.indd 1 h1 10/7/13 6:54 PM

Zapojte se do konverzace o tomto výrobku
Zde můžete sdílet, co si myslíte o Auriol IAN 91944 Hodinky. Máte-li dotaz, nejprve si pozorně přečtěte návod. Žádost o příručku lze provést pomocí našeho kontaktního formuláře.